We have already covered the basics of extensions for CPN Tools 4 in Part 1. I strongly suggest reading that before this part, as I’ll refer to concepts of that part (especially the communication patterns and the Extension interface).
In this part we’ll go thru setting up for development. I’ll keep the description neutral of a particular tool, but I use Eclipse for development, and it’s probably easier for you if you do too. We’ll also cover some of the basic abstractions we didn’t cover last time, including depending on other extensions (and a particular useful extension), and adding options and instruments to the CPN Tools GUI.
Setup
To get started, you only really need the SimulatorExtensions.jar shipped with CPN Tools 4. It might, however, be simpler to use or at least refer to the source code for the extension server. Like the rest of CPN Tools, the simulator extension server is open source, and you can get everything right here (link is for the 4.0.0 released version, if you want the bleeding edge head version, go here instead). That link points to out Subversion repository and you can check out the source from there. Before you do that, I urge you to read on, however.
The source is split up into separate Eclipse projects. It should be possible to use another tool with the correct setup, so good luck with that if you don’t use Eclipse. Here I’ll just list the projects necessary to get started. The SimulatorExtension.jar also includes other projects, and I’ll list those as well as Eclipse will complain otherwise.
- org.cpntools.accesscpn.engine.protocol
- As the name suggests, this code comes from Access/CPN. It has some basic data-structures for communication. It is in the Access/CPN repository here.
- org.cpntools.simulator.extensions
- The core extension package. It includes the central interfaces and the server handling all communication. It also includes the ModelScraper extension we’ll look at later.
- org.cpntools.simulator.extensions.launcher
- The actual launcher for extensions. It uses introspection and automatically finds all extensions on the CLASSPATH.
- org.cpntools.simulator.extensions.declare
- Implements the Declare functionality in CPN Tools. If you don’t have this guy, CPN Tools will be unhappy if you create a Declare constraint.
- org.cpntools.simulator.extensions.export
- Implements the PNML export functionality in CPN Tools. If you don’t have this guy, CPN Tools will be unhappy if you try to export a model as PNML.
- org.cpntools.simulator.extensions.graphics
- Implements the message sequence chart drawing functionality in CPN Tools. It also contains a library we’ll look at later.
- org.cpntools.simulator.extensions.ranges
- Implements the time interval functionality in CPN Tools.
To test your own extensions, you need the first three packages on your build path, you should probably have the four other listed ones, and you should have your own code. The project is set up so the launcher package imports all the others.
To make a new extension, simply implement the Extension interface from part 1, make sure you have your implementation (and any required libraries) on your CLASSPATH, along with the above packages, and launch the class org.cpntools.simulator.extensions.launcher.Launcher from the launcher package. This automatically finds all non-abstract implementations of the Extension interface and sets up a server with those.
You can add your extension to the default extensions on your computer by packaging it in a jar file and dumping in the in the extensions\plugins subdirectory of the CPN Tools installation directory (by default c:\Program Files\CPN Tools\extensions\plugins on 32 bit architectures). The SimulatorExtensions.jar file is in the extensions subdirectory. You can start extensions manually by double clicking this jar file; if your extension is in the plugins directory, it should show up automatically.
AbstractExtension
The Extension interface has a lot of methods, most of which are not necessary for normal operation. For this reason, the AbstractExtension takes care of all of the boiler-plate and provides a number of convenient functions. In fact, you only have to implement getIdentifier and getName of the Extension interface to make a working extension. As custom prescribed, have HelloWorld for CPN Tools extensions:
[java] public class HelloWorld extends AbstractExtension {public String getName() {
return “Hello World”;
}
public int getIdentifier() {
return Extension.TESTING;
}
}
[/java]
Compiling and running, we get the extension server window with out new extension listed:
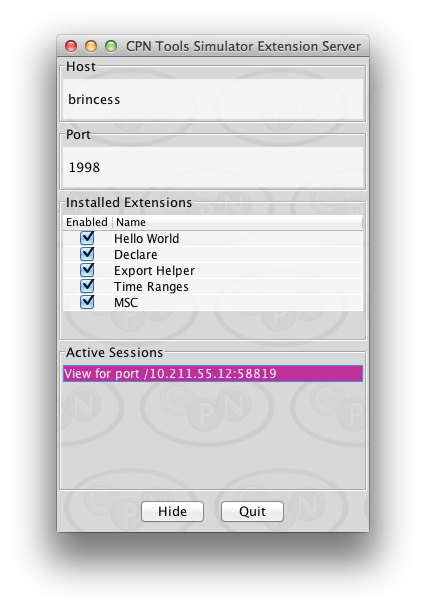
Our extension also shows up in CPN Tools under Options -> Extensions:

In the example, we use Extension.TESTING (l. 7) for the extension identifier. This is ok for testing (hence the name), but should not be used for real deployment. You should also not just make up a number. The server checks and does yield an error if there is a conflict. To avoid conflicts, use the procedure here to get a unique identifier (or a range of identifiers) for your extension. You may only distribute extensions with an identifier obtained like this.
The AbstractExtension takes care of providing reasonable defaults for all methods of the Extension interface. This also means that it manages the responses for getSubscriptions (and getOptions and getInstruments). It contains methods for adding any subscription (or option or instrument) to the response, so, for example, the constructor of the ModelScraper we discuss later just add a subscription to a particular command:
[java] private Scraper(final boolean b) {addSubscription(new Command(400, 2)); // Syntax check page
…
}
[/java]
AbstractExtension also has a method addLazySubscription, which registers the desire to make a subscription, but does not actually make it. This is convenient for speed, as an extension can stay dormant and have no impact on speed until it is needed. Any subscription added using addLazySubscription can be effectuated using the makeLazySubscriptions call.
For the remainder of this series, we assume that all extensions are made by extending the AbstractExtension.
Options
Extensions can expose commands to the CPN Tools GUI. These options are automatically kept update by the framework. If you use the Extension interface directly, you get a call to setOption whenever an option belonging to the extension has changed, but the AbstractExtension has a much nicer way to handle that.
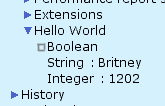
To add an option, we just use the addOption method of the AbstractExtension. An option takes three parameters, a name (shown in the GUI), a key (it just needs to be unique), and a type. Options can have type String, Integer, or Bool. The addOption method takes an optional default value for options. We can augment our Hello World extension to handle options by adding a constructor:
[java] public HelloWorld() {addOption(Option.create(“Boolean”, “boolean”, Boolean.class));
addOption(Option.create(“String”, “string”, String.class), “Britney”);
addOption(Option.create(“Integer”, “integer”, Integer.class), 1202);
}
[/java]
These show up under Options in CPN Tools:
When an option is changed, this is directly reported back to the extension. The AbstractExtension extends Observable and turns the call into a notification. The notification contains the option instance changed, which can be used to get the value. A simple that just prints the value if if is a boolean would change the constructor to:
[java] public HelloWorld() {addOption(Option.create(“Boolean”, “boolean”, Boolean.class));
addOption(Option.create(“String”, “string”, String.class), “Britney”);
addOption(Option.create(“Integer”, “integer”, Integer.class), 1202);
addObserver(new Observer() {
public void update(Observable source, Object value) {
if (value instanceof Option) {
Option o = (Option) value;
if (o.getType() == Boolean.class) {
System.out.println(o.getName() + “: ” + getBoolean(o));
}
}
}
});
}
[/java]
ModelScraper
The ModelScraper is a standard extension. It receives and maintains information about a model from the GUI. The information is then translated into to high-level messages, so developers do not have to bother with that.
To get such notifications, we just need to piggyback onto the ModelScraper extension. This is done using the getExtension call of the Channel. This must not be done in the constructor, but should be done in the setChannel method (or in an event handler triggered after this call). The PP-CPN extension (not yet official) uses code which basically boils down to:
[java] final Scraper s = channel.getExtension(Scraper.class);s.addObserver(this);
s.notifyMe(this);
[/java]
Here, we first find the instance of the Scraper extension (l. 1). We then add ourselves as observer (l. 2). Finally, we ask to receive notifications for any model changes we may not have received yet. This is useful if out extension is activated after some modeling has taken place. The ModelScraper will simply issue events as if the model was just created, so we do not need to handle this specially.
We can also just use the Scraper to inspect the current state of the model if we do not need live updates. It contains a data structure representing the net elements and allows traversing this structure.
The ModelScraper issues events (subclasses of the class org.cpntools.simulator.extensions.scraper.Scraper.Event class) when a model element is added, changed or removed, and when an arc has changed. For example, to print out whenever a new place has been added, we could (with grave abuse of instance initializers) write something like:
[java] public void setChannel(final Channel c) {super.setChannel(c);
final Scraper s = c.getExtension(Scraper.class);
s.addObserver(new Observer() {
{ s.notifyMe(this); }
public void update(final Observable source, final Object value) {
if (source == s && value instanceof Scraper.Event) {
final Scraper.Event e = (Event) value;
if (e.getType() == Scraper.EventType.ADDED && e.getElm() instanceof Place) {
final Place p = (Place) e.getElm();
System.out.println(“Place ” + p.getName() + ” added.”);
}
}
}
});
}
[/java]
We have already seen lines 3-5. Line 7 checks that the notification comes from the Scraper (here it cannot come from other places, but in general we may use the same Observer for multiple Observables) and has the correct type. If so, we case the passed parameter to an Event (l. 8). We then check the type of the event and that it is about a place (l. 9). If all checks out, we print out a message that a new place was created with a given name.
Instruments
Extensions can also add new instruments to the GUI. This functionality should be used very sparingly. An extension should rarely add tools, and even if so most likely only one. This is not a carte blanche to spam the user-interface with dozens of instruments of dubious utility.
Instruments are added just like subscriptions and options: using addInstrument. An Instrument takes up to 5 different arguments:
[java] public class Instrument {public Instrument(String toolBox, String key, String name, String toolTip, Target… targets) {
…
}
}
[/java]
The only required parameter is the name. The name should be short. It is shown in the tool-cell in CPN Tools, and if it is more than 4 characters (5 at most) it is unreadable. It can contain \n for a line break, but at most 3 lines should be shown.
The toolBox is the name of the toolbox the tool should reside in. If it does not exist, it is created, and otherwise the tool is added to the existing palette. It is better to order by functionality than by organization. This mean that if your tool can create things, it should be in the Create palette. It it does stuff to nets, it should be in Nets, etc. Do not put your tools in “My Organization’s Awesome Palette of Tools.” First, that does not show what the tools do, making it difficult to find the tools you need, and the name is far too long. Here’s a couple tools created using this mechanism:
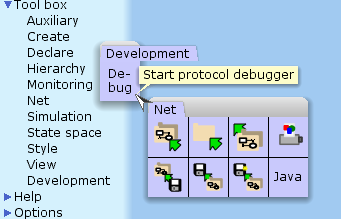
The commands are added using these lines (from different extensions):
[java] exportInstrument = new Instrument(Instrument.ToolBoxes.NET,“export_java”, “Java”,
“Export model as Java code”);
addInstrument(exportInstrument);
addInstrument(new Instrument(“Development”, “debug”,
“De-\nbug”, “Start protocol debugger”));
[/java]
Instrument.ToolBoxes contains symbolic constants for the default toolboxes in CPN Tools, making it easy to add instruments to them. The key arguments are just used for identification and can be imitted, in which case a key will be generated. The last parameter used is the tooltip, which should definitely be used given the constraints of the instrument name.
The last parameter, the target, is a list of allowed target types. The default is Instrument.Target.NET, meaning a model, but this can be specialized to be a place, transition, arc, page, auxiliary graphics, or a combination thereof.
When an instrument in invoked on a suitable target, this is also converted to a notification, this time with a org.cpntools.simulator.extensions.Invocation as parameter. If we wanted to print out all places and transitions when clicked, we could do this:
[java] addInstrument(new Instrument(Instrument.ToolBoxes.VIEW, “Print”, “print”,“Print the name of page”, Instrument.Target.PAGE));
addObserver(new Observer() {
@Override
public void update(final Observable source, final Object value) {
if (value instanceof Invocation) {
final Invocation i = (Invocation) value;
assert i.getElement() instanceof Page;
System.out.println(((Page) i.getElement()).getName());
}
}
});
[/java]
Conclusion
Here, we have looked at the AbstractExtension, which makes it much easier to write extensions. We have seen a particular extension, the ModelScraper, which keeps track of the model and provides high-level notifications for model changes. We have also seen how we can add options and instruments to the GUI and receive high-level notifications.

Hello Mr. Westergaard,
It’s possible to evaluate SML expressions inside the CPN Tools simulator through the method evaluate() called from an Extension?
e.g: channel.evaluate(“CalculateOccGraph()”);
e.g 2: channel.evalueate(“print (NodeDescriptor 1)”);
I need to look for some things of the state space of a CPN model loaded in CPN Tools.
Thanks in advance.
I know that the other option to evaluate SML Expressions is using the method evaluate() from the HighLevelSimulator object of Access/CPN.
Nevertheless, I have viewed that the HighLevelSimulator object of Access/CPN does not establish a connection with the CPN simulator that is currently running and serving the CPN Tools GUI, but it runs a new one, and I need to establish connection with the one that it’s serving the CPN Tools GUI..
Why? Because I want to calculate the State Space of a CPN Model via GUI, and then I want to make queries to the State Space through SML expressions that are executed by an extension that I’m developing.
Hi Julio,
The evaluate call does indeed – in principle – work the same. Unfortunately, due to dumb technical limitations, it is not possible to get a textual result back.
You cannot use Access/CPN and the high-level simulator together with simulator extensions – Access/CPN is not currently compatible, and as you noticed, it depends on starting an external simulator. Long term goals include merging extensions and Access/CPN into one library, but there is more stress on long than on goal in that sentence 🙂
What you can do is to make a RPC callback method and send your data to that. This can be prompted by the code evaluated. What happens is quite complex (you call SML, which evaluates code – pattern 5 – which calls Java – pattern 6), but the library takes care of all of the complications for you. Check the extension tutorial part 3 for examples on how to make a callback. Make your callback code simply store the string you get and fetch it after the fact.
For your particular example, though, there is a simpler way. The CPN protocol does support the two calls you need, generate state-space and get node, see http://cpntools.org/cpn2000/cpn_messages_state_space You can either move the desired node to the simulator using command 4 and get the marking of individual places, or you can get a textual description of the entire state using command 10.
Hope this helps,
Michael
You were right! Simpler way using the protocol. I’m using the CPN Tools commands through the use of packets. However, how I can get the “ssid” (state space id) extra call parameter for the use of most of the commands listed in http://cpntools.org/cpn2000/cpn_messages_state_space ?
For example, having calculated the state space in my simulator, how I can get the ssid in order to get some arc or some node.
The ssid is just any identifier. It’s used by CPN Tools to allow saving node descriptors and only expand them if they correspond to the currently loaded state-space in the simulator.
However, for your purpose, it would be much simpler and faster to just make a bit of SML code. Use the DOT export as an example (http://cpntools.org/documentation/tasks/verification/drawing_state_spaces_with) – or, heck, use the DOT export directly, depending on your exact needs. If you need another format, take a look at the state space traversal functions like SearchAllNodes/SearchAllArcs. You can find the source for DOT export (using these search functions) at https://gitlab.westergaard.eu/cpn-tools/gui/blob/master/cpntools/cpnsim/statespacefiles/export/OGtoGraphviz.sml or the direct support for exporting finite automata at https://gitlab.westergaard.eu/cpn-tools/gui/blob/master/cpntools/cpnsim/statespacefiles/export/OGtoFSMView.sml
Uh, forgot to mention: take a look at Jonathan Billington’s work. He used to convert CPN state-spaces to finite automata to check language inclusion for network protocols. Much of his work was done using the predecessor to CPN Tools, Design/CPN, but most is still applicable, and he did switch over to CPN Tools later. He have a number of tutorials you can probably find online. Guy Gallash and Brice Mitchell (and others from Adelaide) also worked on this.
Hello Mr. Westergaard,
Thank you so much for your answer! I will work on it.
I’m working on my undergrad thesis project. It consists in the development of an extension of CPN Tools that could be able to convert the state space of a CPN model into a finite state machine. For the conversion, I’m using the library OpenFST.
However, before the conversion I need to calculate the state space, and I must get its arcs and its dead markings. To get the state space I’m assuming that it was previously calculated through the GUI. It’s for this reason that I was asking you how to connect through Java to the CPN Tools simulator that is specifically serving the GUI. With the State Space generated and stored in the simulator that it’s serving the GUI, I need to look up throug Java those two things: the arcs and its dead markings.
I will highly appreciate if you have any additional comment or particular hint. Thanks again and regards! 🙂
Julio
Professor Michael,
Thanks a lot for all your information. Now I have a wide & well-prepared view of what I can do.
Just to know for curiosity, one of my mentors, Professor Maria Villapol (http://scholar.google.co.ve/citations?user=2p9v3b4AAAAJ&hl=en) worked with Professor Billington in early 2000s at Australia, and I don’t know if she also worked directly with Professor Guy Gallash.
The motivation of the work has been to convert the SS into a FSM and minimize it at possible for network protocols analysis. My idea has been to grab part of the work from those years and package it into an extension from CPN Tools in order to have a fast & user-friendly way for analysis.
Thanks again for your responses, and I’m at your disposition for anything you may require.
Greetings from Caracas!
Julio Carrasquel
Professor Michael,
i want to know how to connect the CPN Tools and Java(or eclipse),could you give me a detail steps to complete this process. thanks very much!
Hello Zheng,
A connection specifically between CPN Tools and Eclipse it’s not officially released (as far as I know). In the other hand, talking about Java, you have two options and they really depend on what do you want to do.
If you want to develop a Java-based software that could be able to live outside CPN Tools I recommend you to use Access/CPN. With Access/CPN you will be able, among other things, to connect your external Java application to a CPN Tools simulator and take out the benefits of the use of the CPN Tools simulator. Also, you will be able to import CPN models that could be stored in .cpn files. In this case, I recommend you to see http://cpntools.org/accesscpn, and read the associated paper of Access/CPN.
However, if your interest is to embed your Java application as a functionality within the CPN Tools GUI, I definitely recommend you to use the CPN Tools Extensions. For this, I recommend you that you study the blog entries of the professor Michael that deal with this option.
Kind Regards,
Julio César
Hi Micheal,
I am creating an extension and would like to put an image for that extension. Is there a way to put the image on the instrument? While creating the instrument the name is taken as String.
Hi Aman,
There is no way to make an image as your icon. The images in CPN Tools are all created as vector-graphics programmatically, so it would be very difficult to map from normal image formats.
Hi Micheal,
Can we create Places and Transition using the Java interface or GUI In an automated manner ?