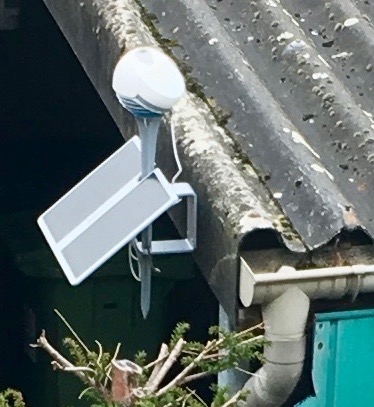
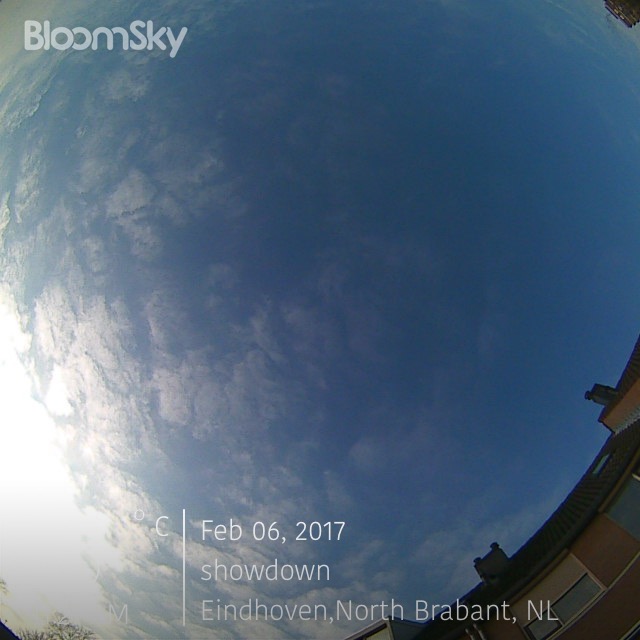
 I got myself a BloomSky Sky 2 weather station on Kickstarter. It’s pretty neat. It measures all kinds of weather things, like temperature and humidity, and snaps pictures of the sky every 3 minutes during the day.
The thing is cloud connected, which is hilarious because it’s about weather. That means it uploads weather information to the cloud periodically, and I can in turn use an API to extract the data and can download a daily time-lapse of the sky.
That’s all neat and all, but I wanted to control my own data. Not for any good reason, really. I just felt like it. Plus, it would allow me to reach nearly instantaneously on weather changes which seems like a good idea, I guess?
 I had no idea how the device is communicating with the cloud, except I know it needs access to my WiFi. So, I did the only sane thing, and cranked up Wireshark to sniff the traffic. Unfortunately, that didn’t yield anything meaningful as my laptop is on another network and traffic from my IoT devices do not get full access to my secure network.
No biggie, I have an internet device that looks like it was made by McDonald’s in the 90s and sounds like a cross between a fat German and an Austrian pedo: the Fritz!Box. It’s a pretty neat device, so I can just go to a secret page and have it capture data, and send it to me in a format I can load and inspect in Wireshark. Capturing for 5 minutes or so, I get this data:
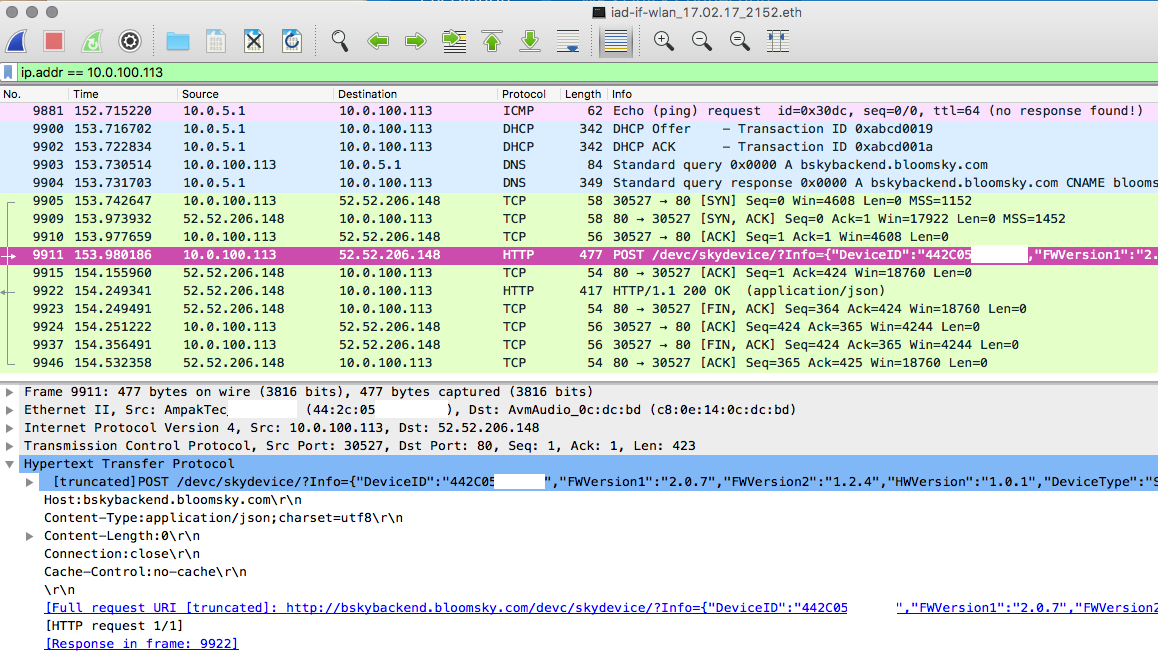
We can nicely see what the device does: it turns on the WiFi, requests an IP address from the DHCP server, looks up bskybackend.bloomsky.com in DNS and makes a single request to a REST web-service. The call is formatted weirdly; it is sent as a POST request with a Content-Type of JSON, but the body is empty. Instead, a GET parameter is passed, containing a JSON object that looks like a single datapoint. I theorize that this is because it wants to send the image data in the body and just make a single request. The image data is only sent during the day to conserve power, so that would explain the body being empty here as the capture is done in the evening.
To learn a bit more about the protocol – to validate my assumption that the image is sent in the body and to check whether the device might make other calls, I decide to go with my standard tool for sniffing web-services: mitmproxy. mitmproxy makes it very easy to make MITM (man in the middle) attacks and sniff out all data. I set it up on my web-backend machine (dont-keep-me-waiting) and let it redirect to an IP address I got by looking up bskybackend.bloomsky.com, and point my web-frontend (shadow) towards the backend for bskybackend.bloomsky.com. I furthermore set up my DNS machine (where-are-you-now) as authoritative for bskybackend.bloomsky.com and let it point towards shadow.
This whole shenanigan makes it so that I can intercept and inspect all requests inside mitmproxy. A normal request would go something like this:
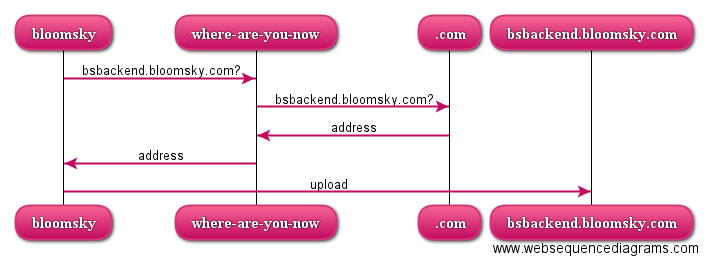
But a request for bskybackend.bloomsky.com now instead goes like this:
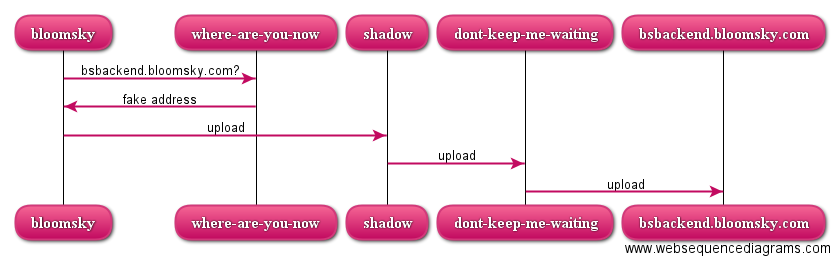
I could have made my DNS point directly towards dont-keep-me-waiting, but for technical reasons (the server is already running something else on port 80) and functional reasons (nobody talks to backends directly but the frontend) requests go via shadow first.
All in all, this now allows me to see requests in a neat overview like this:
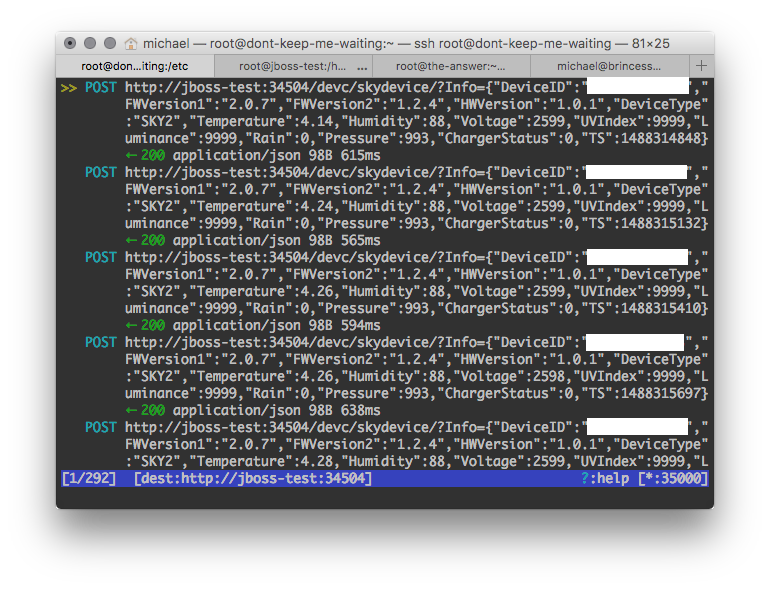
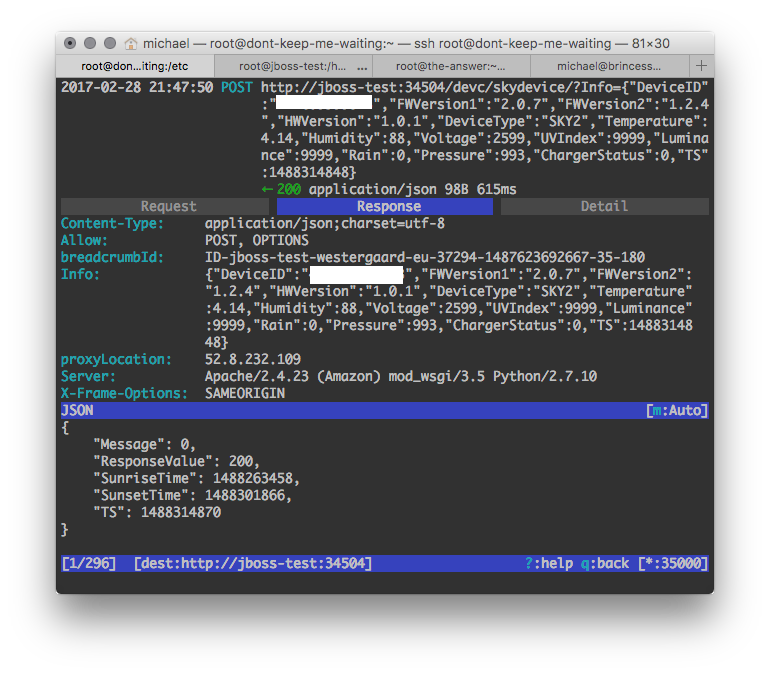
I can even go an inspect all requests individually like this:
I let mitmproxy run for a couple days, and discover that in addition to devc/skydevice, also devc/gettimeinfo2 and /devc/deviceinfo are called at times. There’s probably other calls as well during the device registration phase, but FYGM; this will do for getting data out of the thing.
Because of the reason, I am using the Camel ESB for processing data. I use it in the form of the WildFly Camel patch for the WildFly application server. It allows me to fairly simply set up web-services and process various data formats; it is wildly overkill for what we’re doing here, but I’m working on an application for similar purposes anyway (that’s a topic for another post that’s been long in-progress), so I had a skeleton running anyway.
For data storage, I decide to go with a time-series database. That’s a database optimized for storing data that depends on wall-clock time. That’s a perfect match for periodical temperature measurements (and other numbers measured at periods). Time series databases provide advantages for aggregation over time intervals. I have experience with the cloud-based commercial solution Energyworx, so instead I went for the semi-open self-hosted InfluxDB. I had done a bit of searching for free time-series databases and at the time InfluxDB seemed the best choice. Also OpenTSDB seems like a viable alternative. I could also just use a standard relational database, but I wanted to play with a different system.
Camel has standard ESB functionality; here we will set up a REST endpoint using the REST DSL. For those interested, I’m using Camel with CDI configuration, which is an alternative to Spring or Blueprint. The very technical rationale behind this decision is that I already had experience with the two other and thought it would be fun to try something new. The main configuration of the REST endpoint is depicted below:
[java] protected void configureRest() {restConfiguration().component(“jetty”).host(“localhost”).port(HTTP_PORT) //
.bindingMode(RestBindingMode.json).dataFormatProperty(“prettyPrint”, “true”) //
.dataFormatProperty(“json.in.disableFeatures”, “FAIL_ON_UNKNOWN_PROPERTIES,ADJUST_DATES_TO_CONTEXT_TIME_ZONE”);
rest().path(“/devc”).description(“BloomSky Proxy API”).produces(“application/json”) //
.post(“/skydevice”).description(“Post new datapoint”).param().name(“Info”).type(RestParamType.query)
.description(“Datapoint information in JSON format”).endParam().to(SKYDEVICE) //
.post(“/gettimeinfo2”).description(“Get time information”).to(PROXY) //
.post(“/postdeviceinfo”).description(“Update device information”).to(PROXY) //
.post(“/{path}”).param().name(“path”).type(RestParamType.path).endParam().to(PROXY) //
.get(“/{path}”).param().name(“path”).type(RestParamType.path).endParam().to(PROXY) //
;
}
[/java]
We first just set up the endpoint (ll. 2-4). This is entirely standard: use Jetty (l. 2; I couldn’t make the Undertow connector that would make more sense under Wildfly work correctly, but I’ll probably fix that later). Bind using JSON (l. 3) and set up Jackson (l. 4).
Then we set up the general REST endpoint (ll. 6-12). First a bit of general endpoint configuration, including a description using Swagger (l. 6). Then we set up the main endpoint taking a parameter Info and forwarding everything to the route SKYDEVICE (ll. 7-8). Next, we match the two other identified endpoints and just forward to PROXY (ll. 9-10). I capture them in case I want to manipulate them in the future; for example, the device only captures during the day but I have a hunch that by manipulating the sunrise/-set information in the gettimeinfo2 call, I can make it capture all day. Finally, I capture all other requests regardless of method and forward them to the PROXY as well (ll. 11-12).
The PROXY route is pretty much a standard web proxy in Camel:
[java] protected void configureProxy() {from(PROXY).routeId(“bloomSkyProxy”).process(exchange -> {
final InetAddress address = lookup(HOST);
exchange.getIn().setHeader(“proxyLocation”, address.getHostAddress());
}).toD(“jetty:http://${header.proxyLocation}/${header.CamelHttpUri}?bridgeEndpoint=true&throwExceptionOnFailure=false”);
}
[/java]
The meat is in the processor (ll. 3-4), where we look up the address of the original HOST using a custom DNS lookup routine to bypass the trickery I’ve set up in my own DNS server (l. 3). We store the obtained address in a Camel header (l. 4) and just forward to a dynamic endpoint using the obtained address and original request (l. 5).
Actually processing the interesting request is extremely simple here:
[java] protected void configureSkyDevice() {from(SKYDEVICE).routeId(“skydevice”) //
.wireTap(DATAPOINT) //
.wireTap(SNAPSHOT) //
.to(PROXY);
}
[/java]
The only thing of interest we do is that we set (asynchronous) wiretaps to store the datapoint (l. 3) and picture snapshot (l. 4). Then the result is just sent to the proxy (l. 5). Here, I just listen in on the conversation using two wiretaps. In principle I could have processed the result from the proxy or generated my own response altogether if I didn’t want to involve the original cloud service.
Here, however, we just listen in and store the data captured in our own database:
[java] protected void configureSaveDatapoint() {from(DATAPOINT).routeId(“datapoint”) //
.setBody().header(“Info”).unmarshal(datapointFormat).process(exchange -> {
final DataPointMessage datapoint = exchange.getIn().getBody(DataPointMessage.class);
final Point weather = Point.measurement(“weather”) //
.addField(“temperature”, datapoint.getTemperature()) //
.addField(“humidity”, datapoint.getHumidity()) //
.addField(“pressure”, datapoint.getPressure()) //
.tag(“device”, datapoint.getDeviceID()) //
.time(datapoint.getTS(), TimeUnit.SECONDS) //
.build();
final Point stats = Point.measurement(“statistics”) //
.addField(“voltage”, datapoint.getVoltage()) //
.addField(“fw_version1”, datapoint.getFwVersion1()) //
.addField(“fw_version2”, datapoint.getFwVersion2()) //
.addField(“hw_version”, datapoint.getHwVersion()) //
.addField(“type”, datapoint.getDeviceType().name()) //
.tag(“device”, datapoint.getDeviceID()) //
.time(datapoint.getTS(), TimeUnit.SECONDS) //
.build();
exchange.getOut().setBody(new Point[] { weather, stats });
}).split().body() //
.to(“influxdb:influxDbBean?databaseName=bloomsky&retentionPolicy=autogen”);
}
[/java]
The Bloomsky device is naughty and sends JSON in a GET parameter of a POST request. That means I couldn’t easily have Camel automatically deserialize the data. Instead, I copied the Info parameter to the message body and deserialized it there (l. 3).
I process the datapoint using a Java processor (ll. 4-21). First, I pick out the data point (l. 4). I have set up a nicely Jackson annotated class representing the message so I don’t have to deal with any transfer formats myself. For storing the data in InfluxDB, I create 2 Points (ll. 5-11 and 12-20). The measurement corresponds roughly to the table in a relational database; I use one for weather data and another for device statistics. To each, I add fields containing the reported values (ll. 6-8 and 13-17). Fields are typically numerical values I can compute over but not search for. I also add a tag (ll. 9 and 17). Tags are like fields, except indexed. By adding the device identifier as a tag, I can store data from multiple devices in the same table and efficiently extract data from just one of them. Finally, I need to add a timestamp for the measurement; this is helpfully reported directly in the message (ll. 10 and 19) or I could just have used the current time.
Finally, I replace the message body by an array of the two new points (l. 21). I do this because that is the simplest way I could think of to store multiple values (an alternative would be to move the datapoint back to a header and then generate and store the points individually. Instead, I just store them in a collection (array really) and just use Camel’s split to store them in InfluxDB using Camel’s relatively recent InfluxDB connector (l. 23).
Aside from a bit of boiler-plate (mostly related to my custom DNS lookup using dnsjava), that’s really it. 175 total lines of routing code (48 of which is the DNS lookup) and 199 lines for the DTO is all it takes.
At this point, I do not store the picture snapshots, but that’s also a simple task with Camel’s file component (or uploading to a file server using any of the many components for this). I am also contemplating other modifications, such as watermarking/anonymizing the images uploaded to the cloud.
I set up the application in the current state on my test Java application server jboss-test, letting mitmproxy instead forward to jboss-test. Now, a request looks as over-engineered as this (the-answer is my database server):
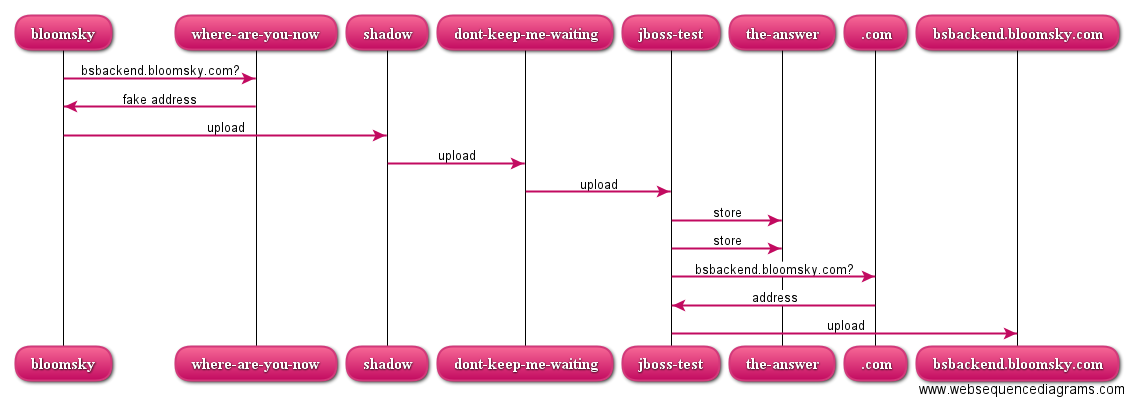
Actually, the mitmproxy screenshots above are from this set-up (the proxied location is shown at the bottom of each screenshot). Once I’m done testing, I will definitely take out mitmproxy on dont-keep-me-waiting, and maybe also remove shadow from the chain as the machine that will eventually run the application will not have other things running on port 80/443 and doesn’t need to be externally reachable.
The data is stored in InfluxDB, which can be conveniently accessed from the command line. Here’s a data dump after half an hour or so of operation:
[sql] [root@the-answer ~]# influxConnected to http://localhost:8086 version 1.2.0
InfluxDB shell version: 1.2.0
> use bloomsky;
Using database bloomsky
> select * from weather;
name: weather
time device humidity pressure temperature
—- —— ——– ——– ———–
1488314848000000000 XXXXXXXXXXXX 88 993 4.14
1488315132000000000 XXXXXXXXXXXX 88 993 4.24
1488315410000000000 XXXXXXXXXXXX 88 993 4.26
1488315697000000000 XXXXXXXXXXXX 88 993 4.26
1488315985000000000 XXXXXXXXXXXX 88 993 4.28
1488316271000000000 XXXXXXXXXXXX 87 993 4.29
1488316559000000000 XXXXXXXXXXXX 86 993 4.35
1488316845000000000 XXXXXXXXXXXX 85 993 4.4
> select * from statistics;
name: statistics
time device fw_version1 fw_version2 hw_version type voltage
—- —— ———– ———– ———- —- ——-
1488314848000000000 XXXXXXXXXXXX 2.0.7 1.2.4 1.0.1 SKY2 2599
1488315132000000000 XXXXXXXXXXXX 2.0.7 1.2.4 1.0.1 SKY2 2599
1488315410000000000 XXXXXXXXXXXX 2.0.7 1.2.4 1.0.1 SKY2 2599
1488315697000000000 XXXXXXXXXXXX 2.0.7 1.2.4 1.0.1 SKY2 2598
1488315985000000000 XXXXXXXXXXXX 2.0.7 1.2.4 1.0.1 SKY2 2599
1488316271000000000 XXXXXXXXXXXX 2.0.7 1.2.4 1.0.1 SKY2 2599
1488316559000000000 XXXXXXXXXXXX 2.0.7 1.2.4 1.0.1 SKY2 2599
1488316845000000000 XXXXXXXXXXXX 2.0.7 1.2.4 1.0.1 SKY2 2599
[/sql]
We see we have 8 measurements of weather data (ll. 6-17) and general statistics (ll. 19-30). The time is measured in nanoseconds, and for each timestamp, we register the tag and field values as expected.
As great as it is to look at the datapoints using the command-line client, it is even better to investigate using a tool just for that. A great one is Grafana, which is a generic dashboarding application for time series data.
Grafana comes with built-in support for InfluxDB (and OpenTSDB and others). After connecting to the database, visualizing data is a simple matter of configuring what to display. For example, here’s a configuration of my temperature panel:
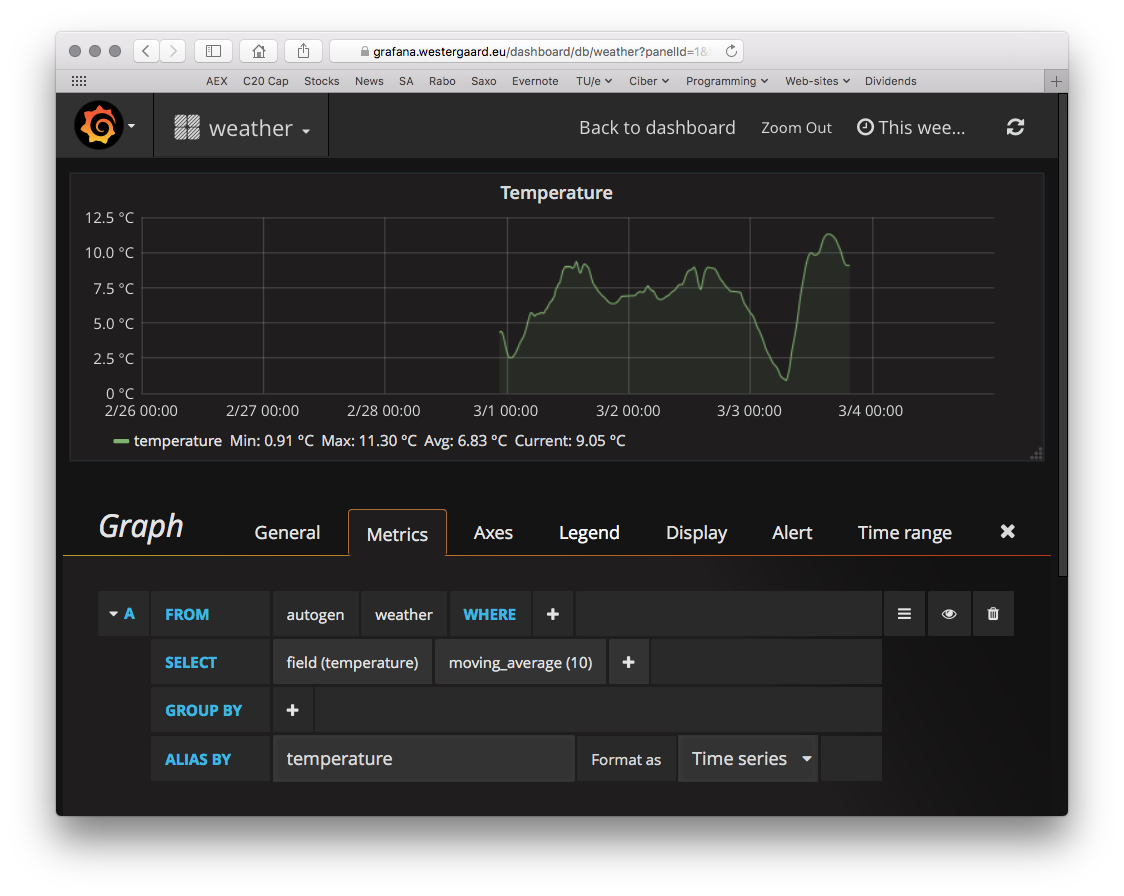
We just pick from which measurement we want data, select the appropriate field (or tag) and optional transformation – here a simple moving average to soften the curves. We could here use the tag we set up (device id) to group by (thereby getting lines for each device) or add a where clause so we only see data from a specific device.
Having picked the datasource, we set up axes:
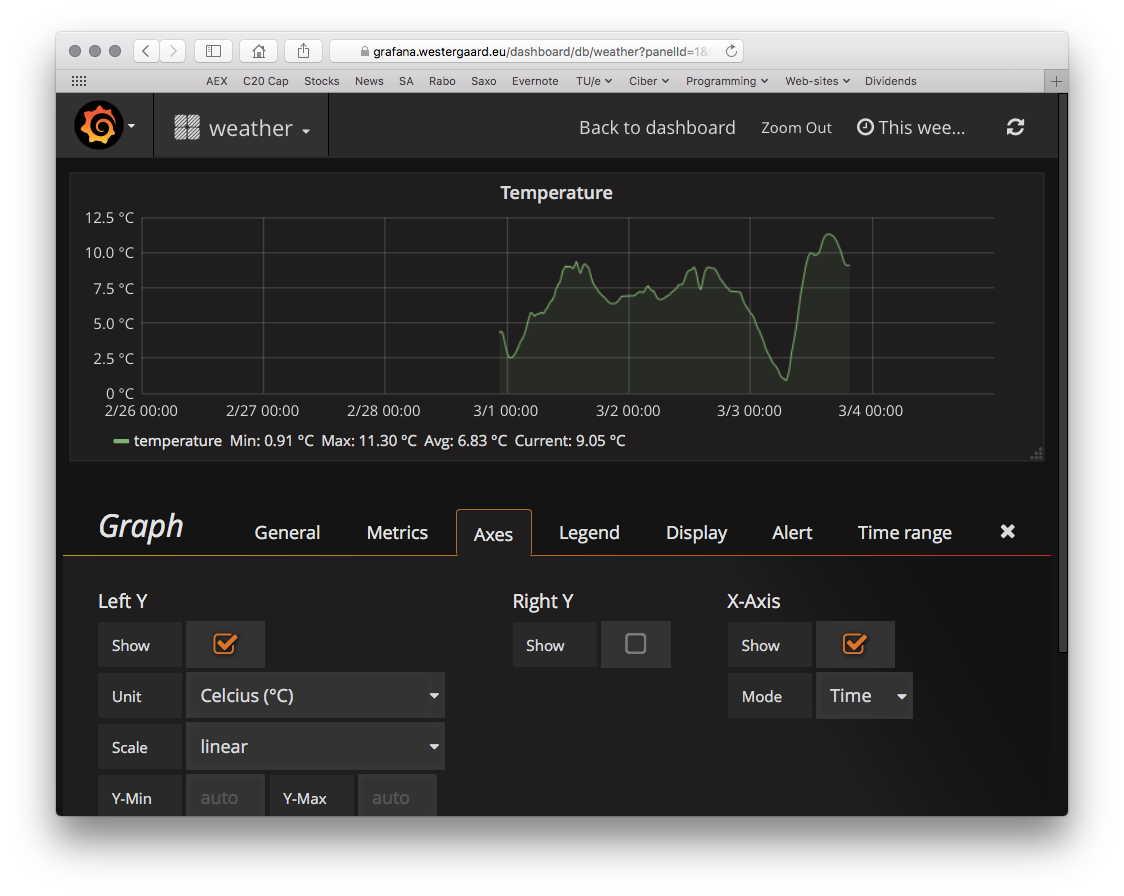
Grafana supports ºC directly as unit, so I just select that and do any other customization of the axes I want (IIRC, that’s nothing). I can set up a couple other panels as well and can set up this neat dashboard. The voltage is the charge of the device; it goes up during the day when it charges from the solar panel and down as it discharges during the night.
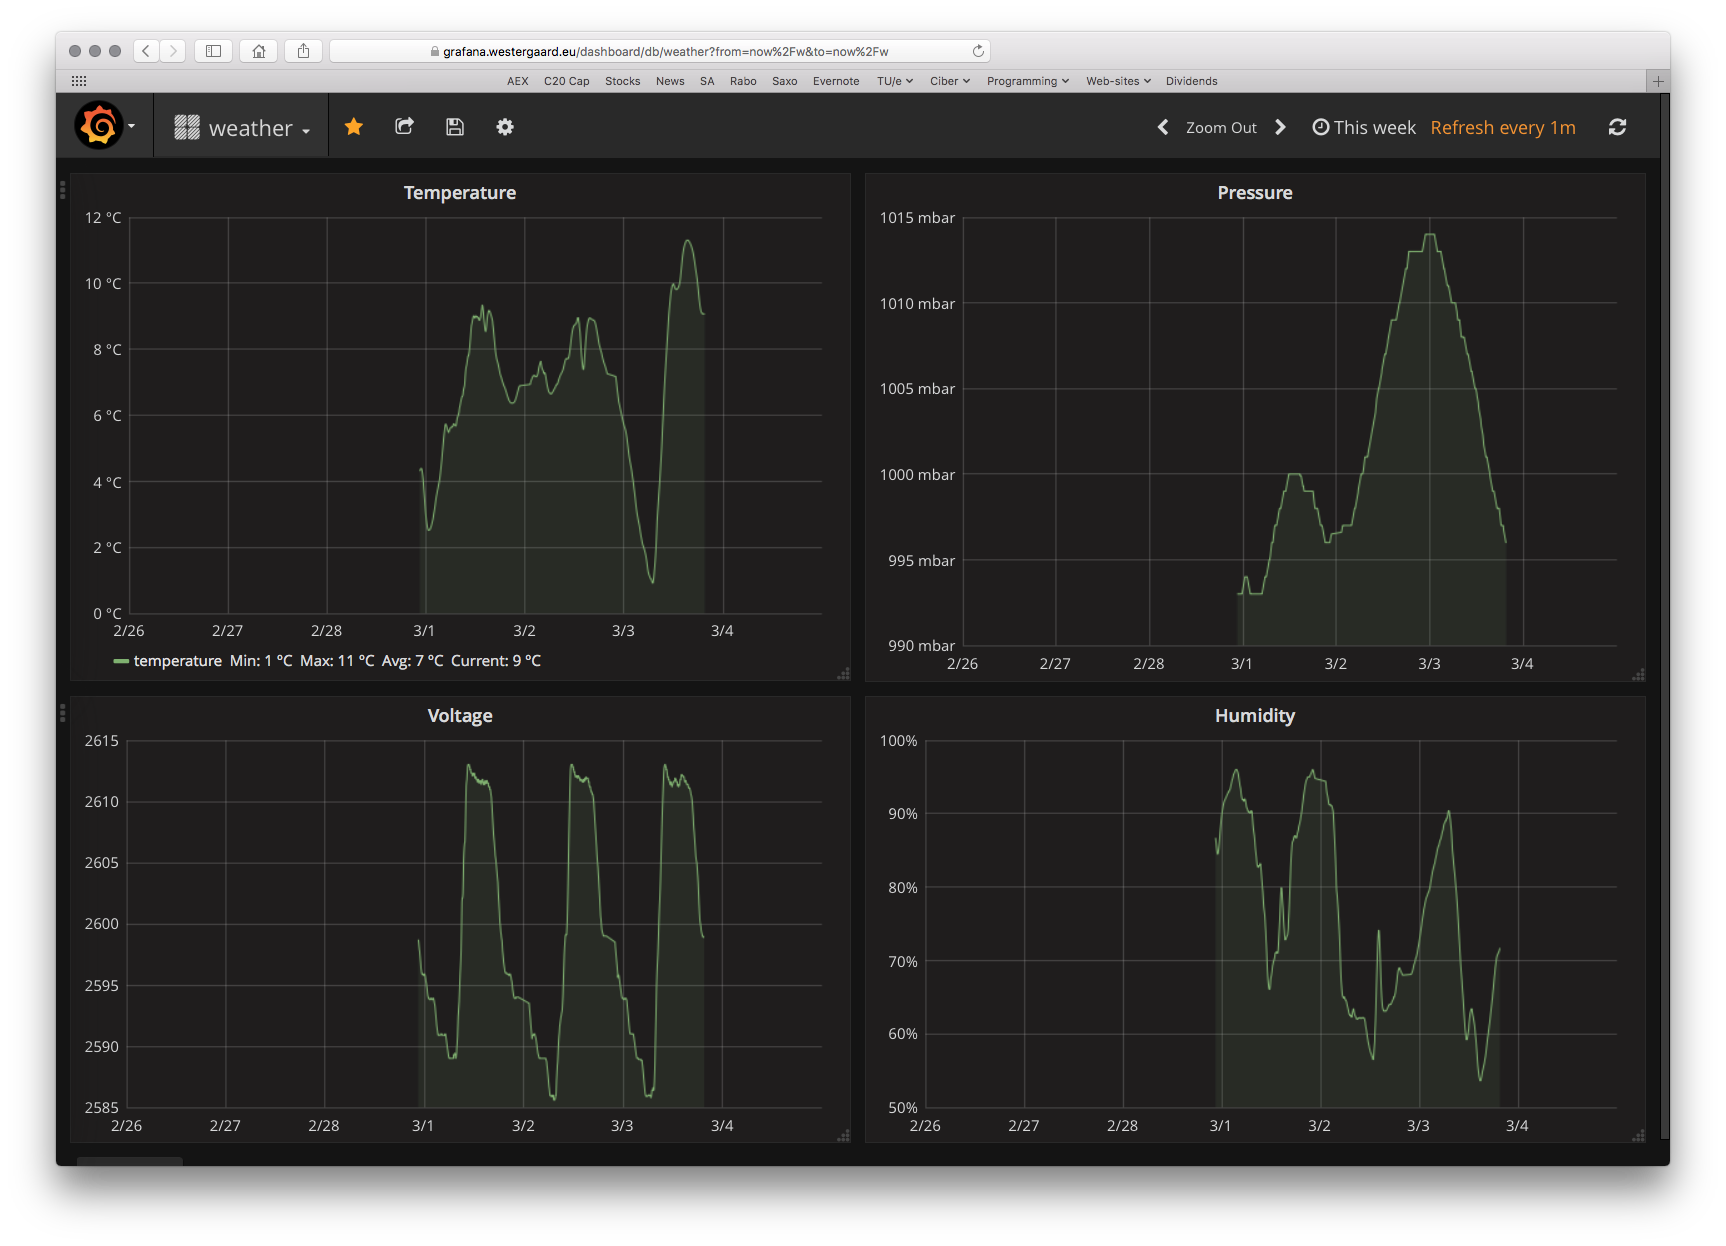
I can choose the time range displayed at the top right and have it refresh whenever I want. I’m looking forward to having more data so I can view an entire year of temperature data with around 500 measurement points/day.
Of course, this will only get more interesting once I start putting more data in the database. I’ve already mentioned that I’m working on a box o’ sensors and curtain-controllin’ goodness (which by the way is the reason I have the Camel application in the first place); there’s no reason not to register all the temperature/humidity/ambient light measurements from that thing in InfluxDB as well. Then I can get a global temperature overview. Then it should be simple to add some intelligence to control things like heating and lights. Another application could be just throwing a standard learning algorithm at it and see how well it can adapt to my habits or predict the weather…
It amused me how ridiculously simple this really was to do. Just a bit of snooping on the line, reverse-engineering the communication protocol, and setting up a simple application for intercepting and storing the data and possibly manipulating it.
An interesting note is that this is all done legally for a device I own on my own network. It was possible because I own the network it is on. There is very little preventing the same technique from being used for more nefarious purposes. For example, a similar man in the middle attack technique is also used in most of the unlock methods for iPhones. So enjoy that, nerds who don’t trust Apple: instead you put full faith in a random Russian who surely has your best interests in mind. It has also been used in online banking attacks to circumvent two-factor authentication, and a variant is used in regular spy-ware.
Anybody can do this if you connect to a network they control. This is most obviously happening if you connect to their Wifi or if they can sucker you into running a virus on your computer (then they control your computer and hence your network). It is less obviously happening if you go via a network they control, as is e.g., seen by corporate or Chinese firewalls.

So did you come up with anything for Bloomsky and Sky? Since we believe Bloomsky is going out of business! we could use a server or a way for us to post threw our own websites.
Thanks Sam
Hi Sam,
Yah, kind-of. I gave some details to Andrew D. yesterday on Twitter – given the timing of your questions, I assume you know/know of each other 🙂
The gist of it is I made some code intercepting the calls before forwarding them to Bloomsky. The intercepted image data is stored as image files + metrics (temperature, precipitation, etc) uploaded to an influxDB database which can be viewed using Grafana.
My code is in https://gitlab.westergaard.eu/brinformatics/iot-bus It’s a bit messy and overly complicated, because I wanted to play around with Camel at the time, so there’s a bunch of unnecessary Camel + netty junk there too. Feel free to use it as/if you see fit. I don’t recall putting as license on it, but anything is good except for AGPL and GPL3. It’s not really in a state where non-developers can use it.
The biggest issue is that I assume I can control the DNS server Bloomsky connects to. I’m literally MITMing the traffic. This only works because BloomSky doesn’t use proper encryption. It also means it’s a lot harder to just roll your own, as you need to also control the DNS. If BloomSky are really tipping over, perhaps it would be possible to negotiate taking over the DNS or pushing a final update that allow configuring the URL of cloud services. Maybe even with TLS so people don’t laugh as hard.
Good luck with the project,
Michael