
A couple of years ago, I was doing a survey of single sign-on solutions. I had outlined this great post about it, modeled after Homer’s Odyssey, where I’d compare some of the SSO solutions on the market to various parts of the Odyssey and it would be quite humorous: Aeolus would be the low-level Spring Security/Spring Social, Circe would be the pretty but deadly WSO2 Identity Server, Scylla would be the many-headed monster OpenAM, Charybdis would be CAS because gosh-darn-it, I’ve picked an analogy and I’m gonna stick with it, until we finally reach the Phaeacians where we finally meet the helpful Keycloak (at the time also known as PicketLink, but now commercialized as RedHat SSO).
I’m sure it would have been quite hilarious with little stabs at how miserable it is to try and configure WSO2 or OpenAM, or how open source and undocumented CAS and Spring Security are. So hilarious indeed, that the post shall remain forever unwritten because penning it would just ruin the Platonic ideal of the idea. This post, therefore, is not about that. Instead, it’s about how I have set up RedHat SSO not only for some of my own projects but also for some of the infrastructure I am using, in particular, GitLab and WordPress. After getting that running, I’ll also show how I integrated this all with Duo Security for 2FA using their excellent platform
Keycloak

Keycloak is a really well-written piece of software. It follows RedHat’s philosophy of developing software as open source and periodically make snapshots to sell as commercial products together with support and security fixes; the commercial counter-part to Keycloak is RedHat SSO. RedHat uses the same model for Wildfly and JBoss EAP and other products.
Keycloak supports many features you would expect from an SSO solution if you had done enough investigation into what an SSO solution would normally provide. Most importantly, it supports multiple realms each with their own set of clients (such as my GitLab and WordPress installations), identity providers (such as Facebook or StackExchange), optional user federation, and authentication flows. It is possible to configure users and groups for each realm. Keycloak supports all the standard identity provider protocols, such as SAML and OpenID Connect (you might know this as OAuth 2.0).
Keycloak also adds standard abilities like viewing (and terminating) active sessions centrally and impersonating users, which is useful for applications that don’t support that out of the box. It is very friendly with allowing multiple logins on different realms.
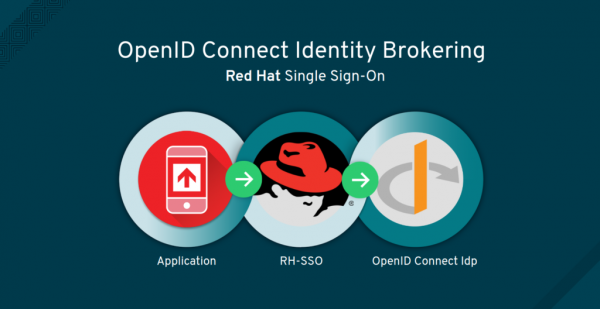
What this all means is that I can keep identities in Keycloak and allow users to log in using Facebook, other social services, or e-mail, and my applications do not have to care about any of this. If a user is logged in to one of my applications, it is trivial to use other applications without logging in again, a bit how you just log in to Google once and are then free to provision a cloud cluster or post a racist comment on Youtube without having to identify you towards Google.
For this, I am using the latest Keycloak 4 beta (beta 2) in anticipation of a final version getting released as soon as Wildfly 13 is.
GitLab

Getting SSO working with GitLab caused me a surprising amount of problems. It’s just not very well documented, I suppose. If you Google GitLab and Keycloak, you are likely to end up in discussions about making this work with SAML. Don’t listen to that garbage. It is a time sink that can only end with sadness. Making GitLab work with Keycloak using SAML never worked out for me.
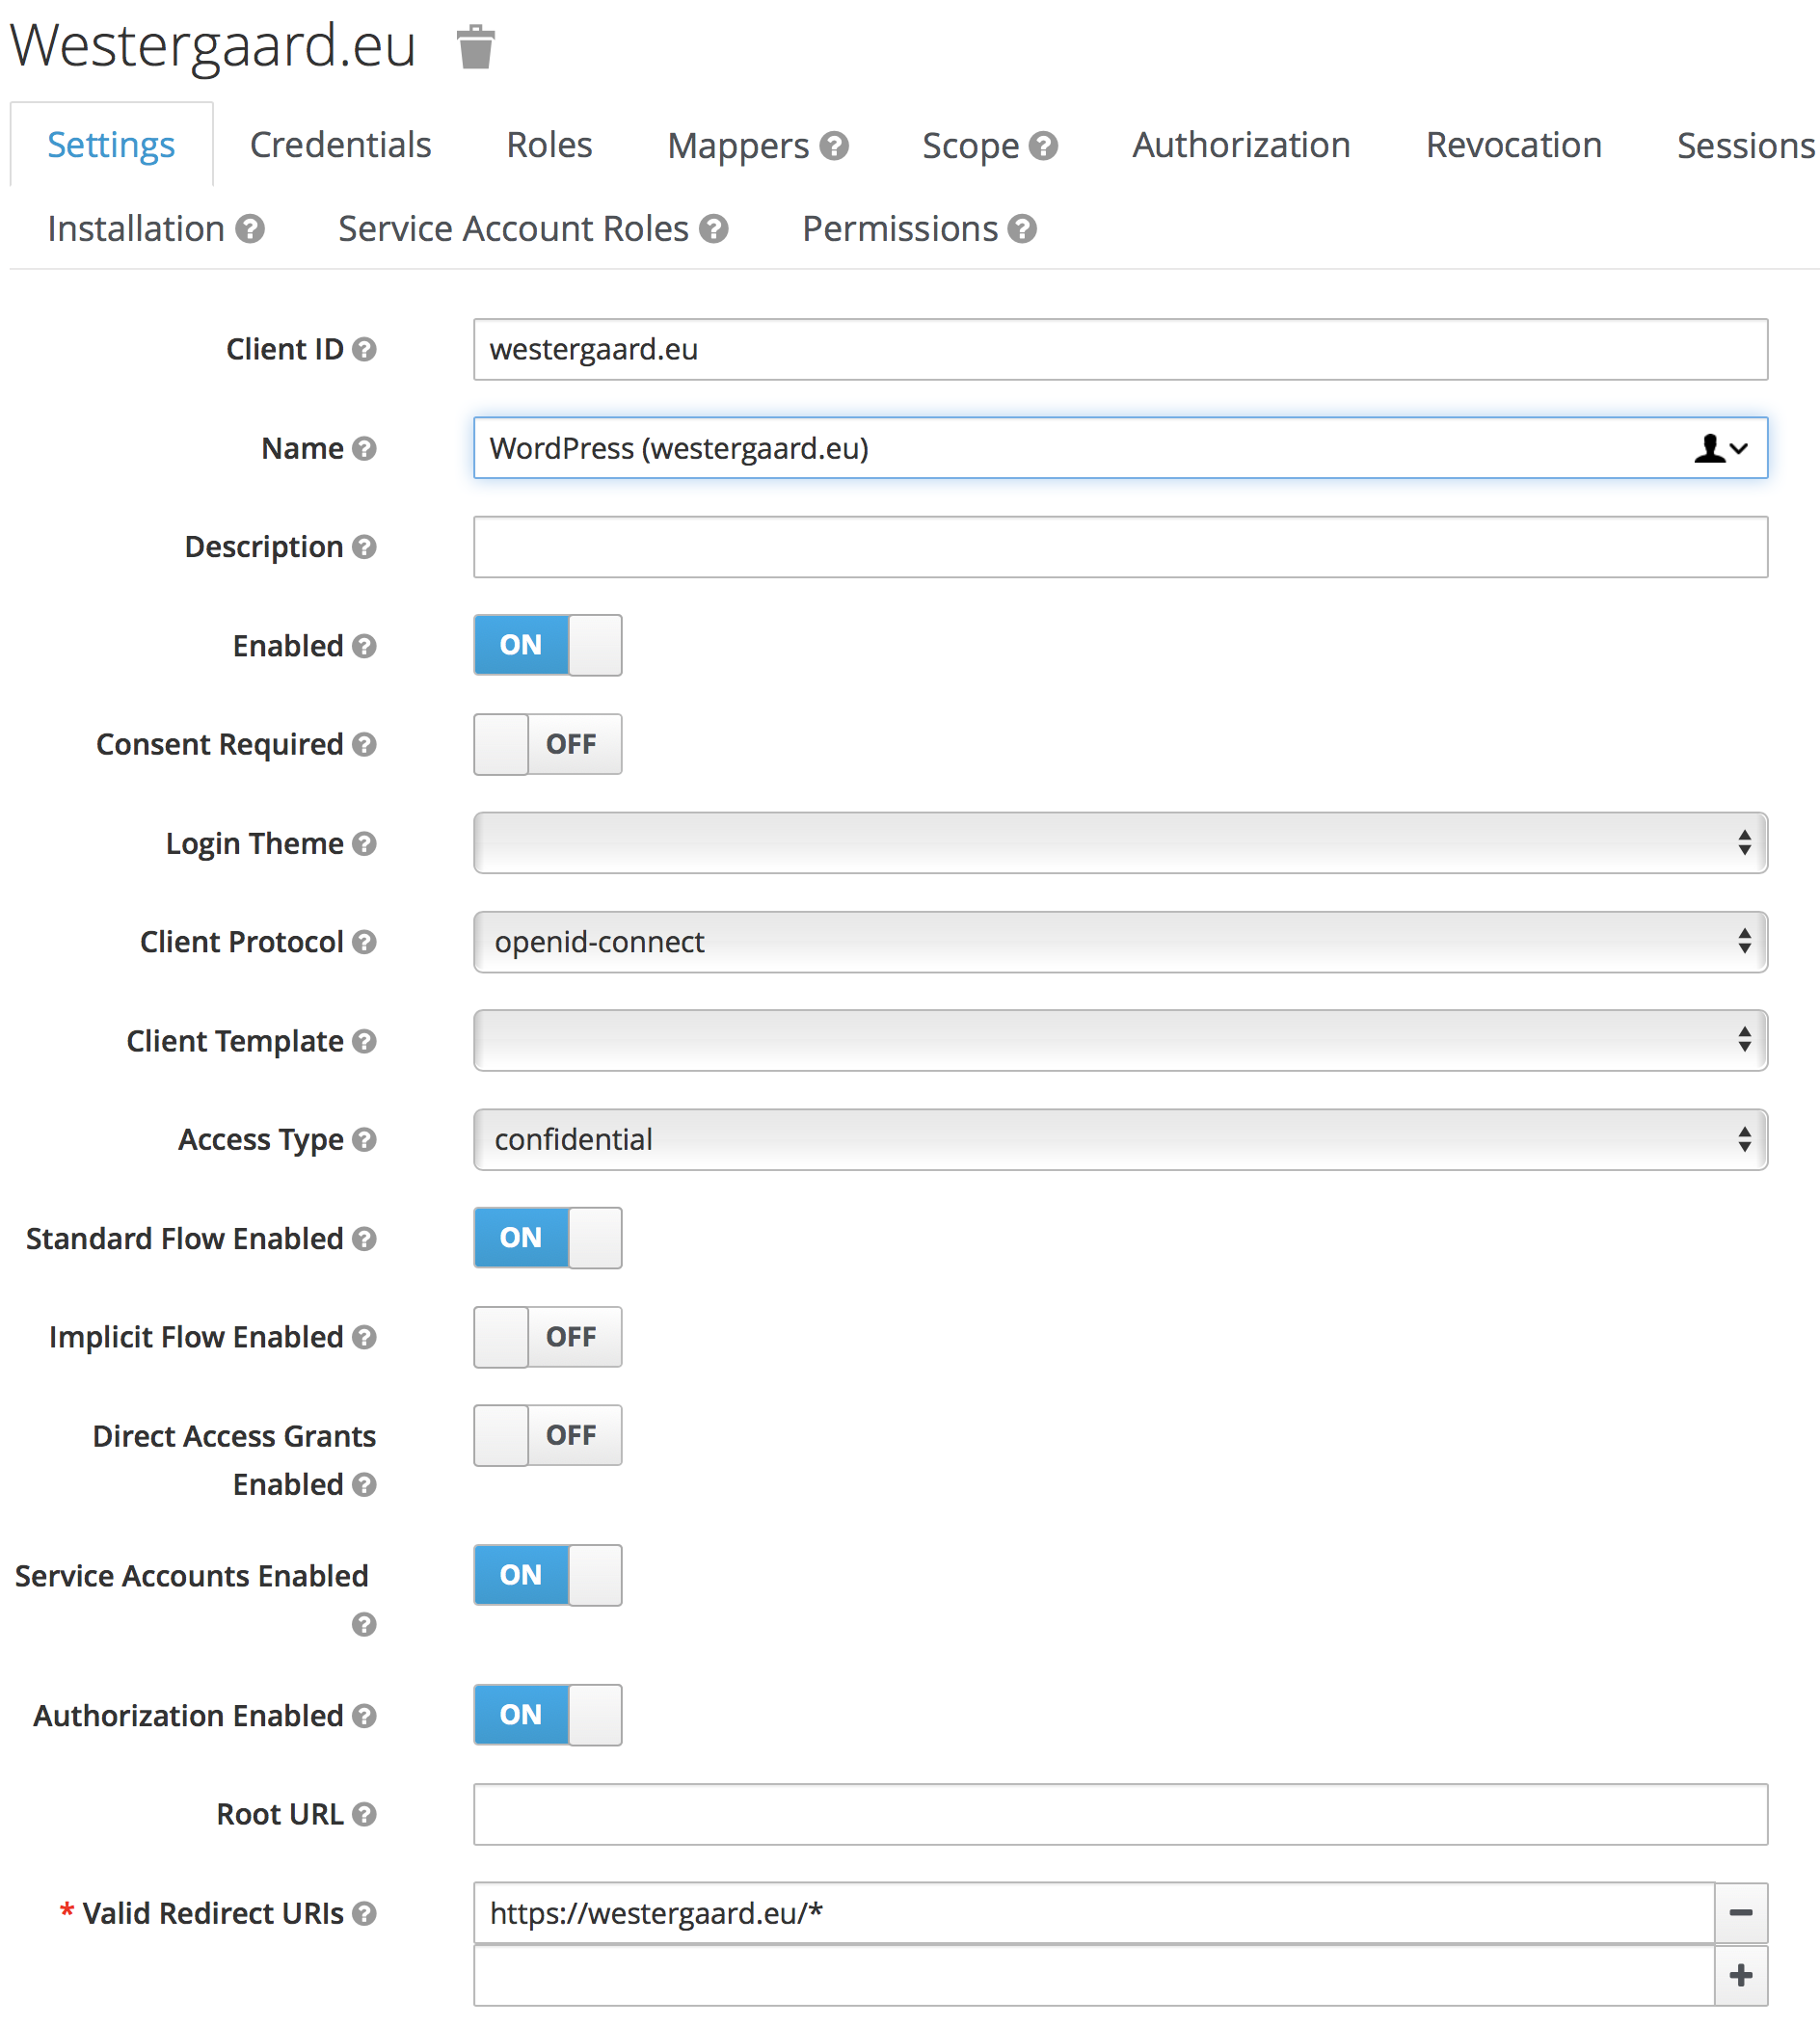
Instead, I ended up configuring my GitLab to use Keycloak in OpenID Connect mode. I found this forum post after quite a bit of searching. Other posts contain partial or outdated truths. Based on this, my Keycloak configuration for GitLab looks like this:
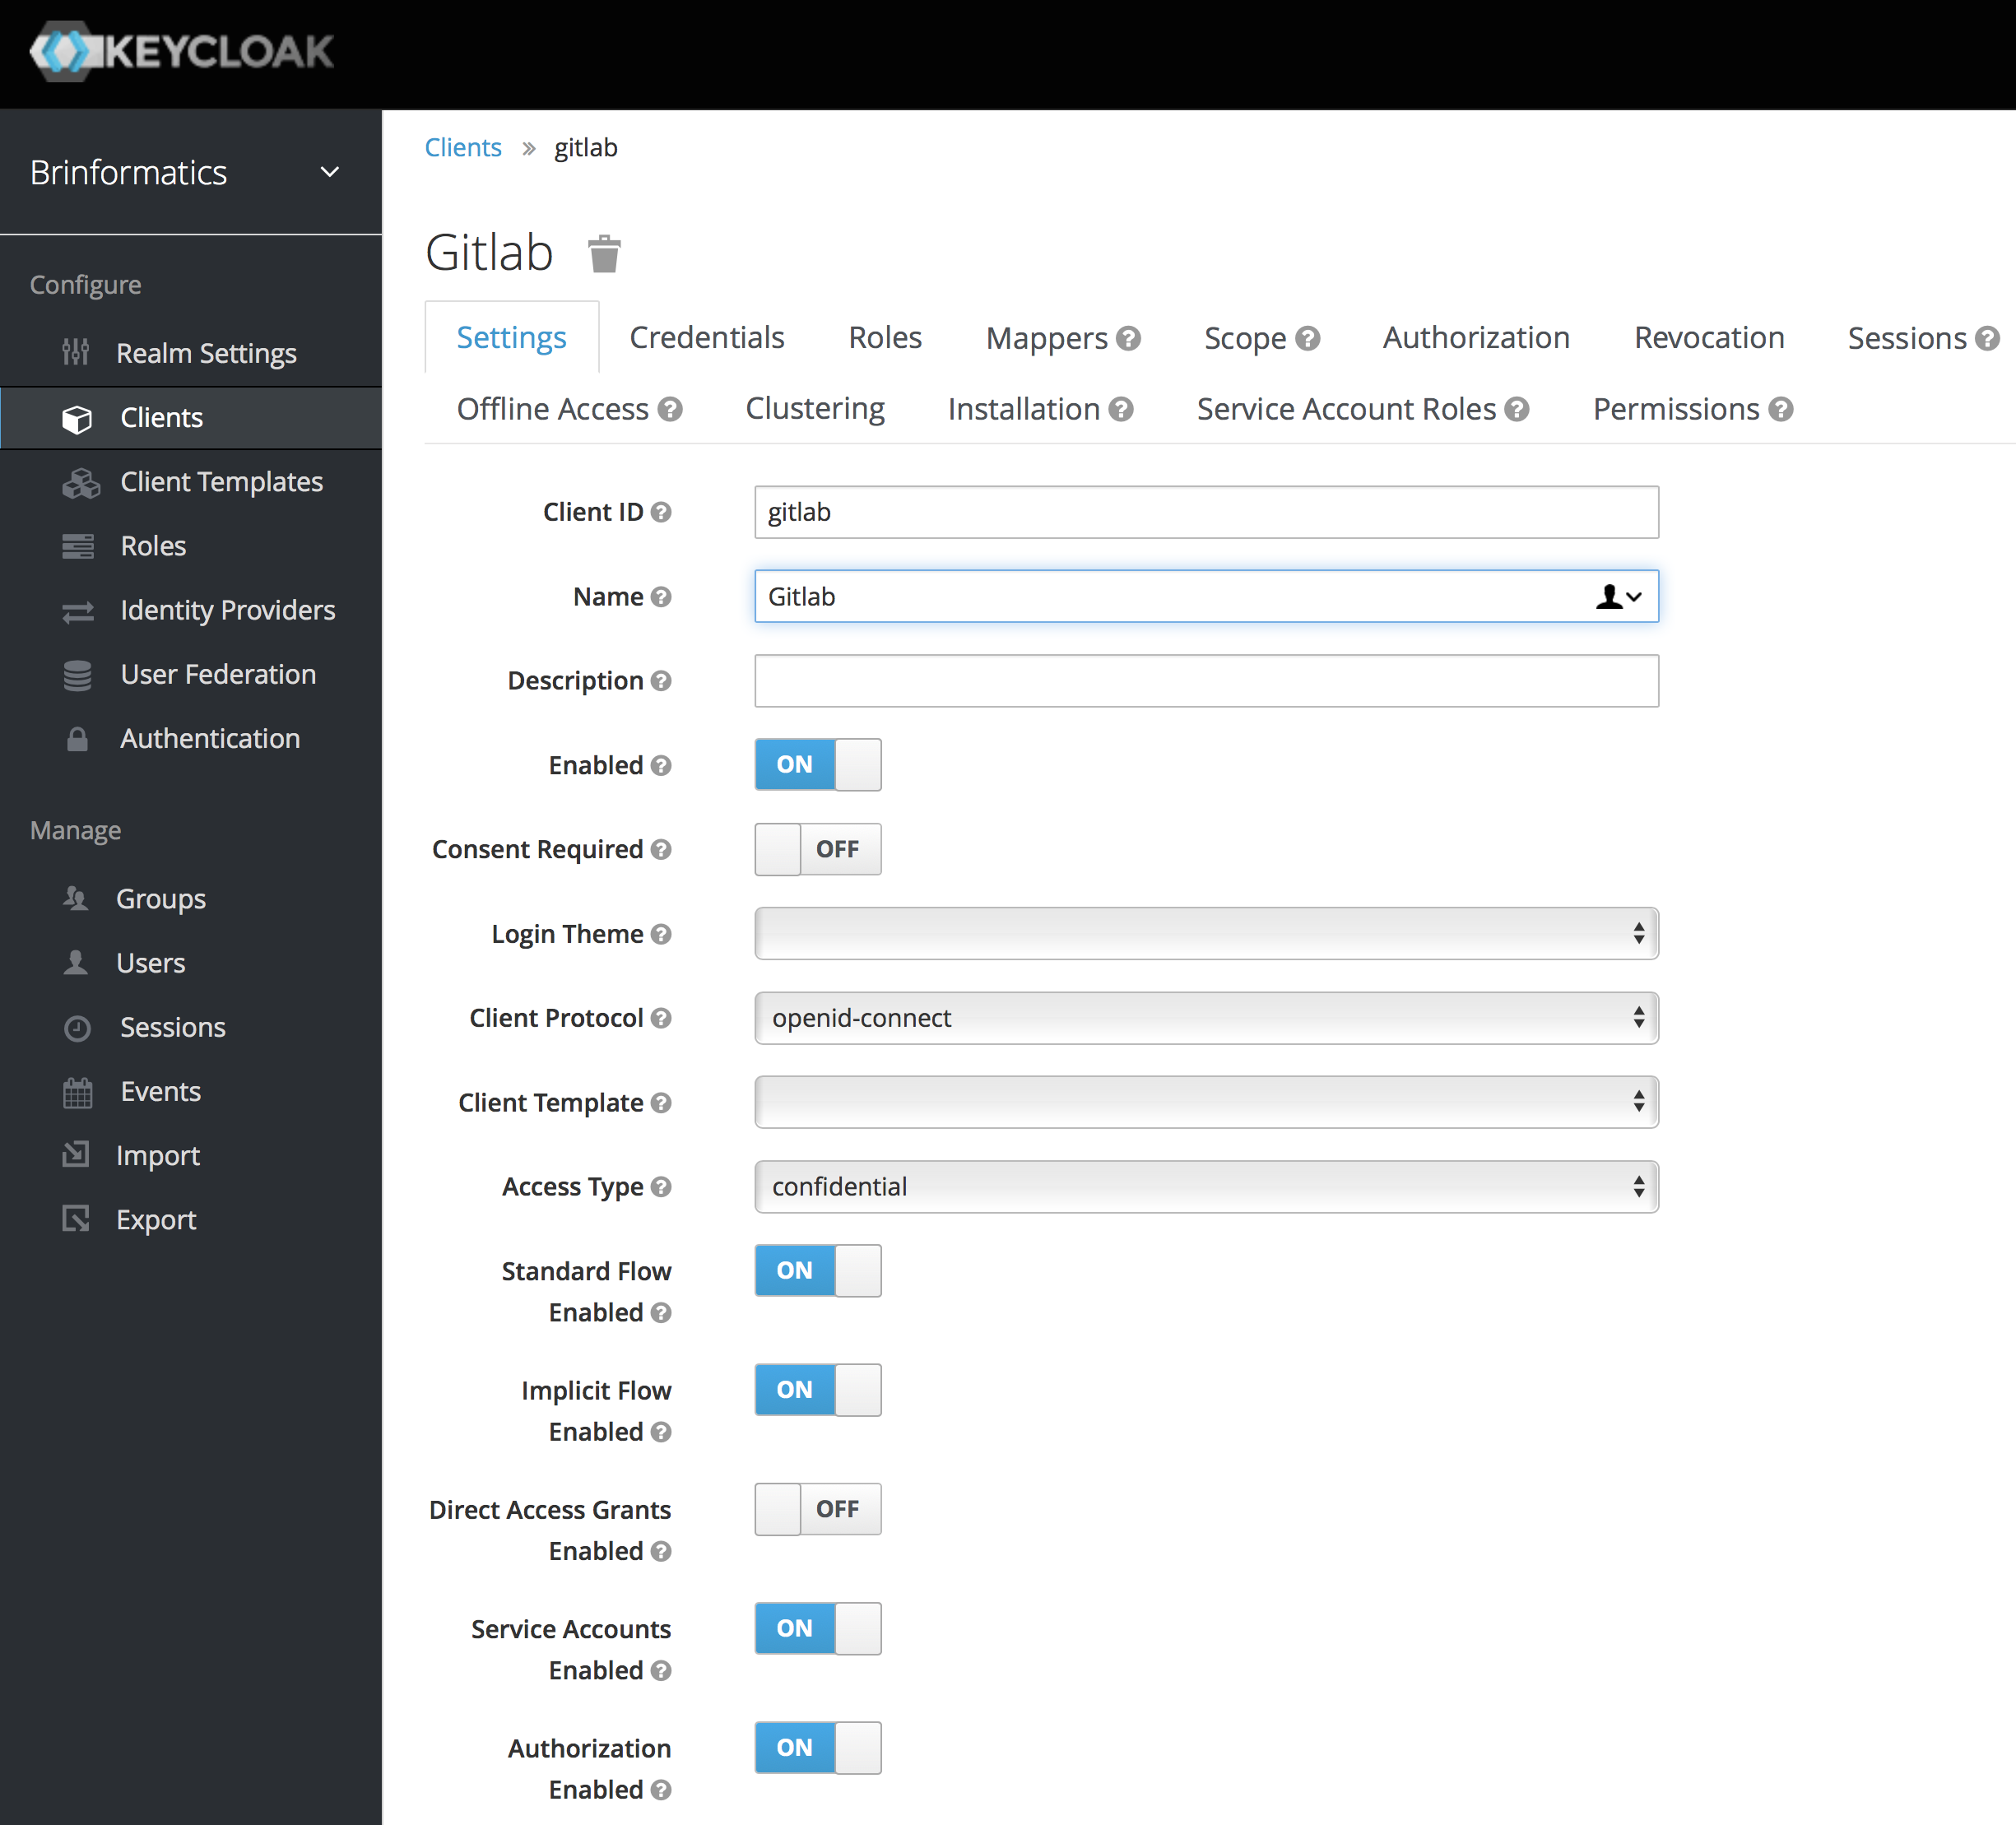
That’s all pretty standard, though I have switched to using confidential access type. My redirection URLs are:

The only non-standard this is that I have two “official” server names for my GitLab server (most of my services have just a single canonical name with all other names redirecting to the canonical one). The final minor
On the other end of the connection, I am using GitLAb in the omnibus configuration, so configuration happens in /etc/
It may be very useful that Keycloak exposes a JSON service which provides information about endpoints and available services if you go to /auth/realms/REALM_NAME/.well-known/
My final configuration is:
[ruby]
# OmniAuth
gitlab_rails['omniauth_enabled'] = true
gitlab_rails['omniauth_block_auto_created_users'] = false
gitlab_rails['omniauth_allow_single_sign_on'] = ['oauth2_generic']
gitlab_rails['omniauth_auto_sign_in_with_provider'] = 'oauth2_generic'
gitlab_rails['omniauth_providers'] = [
{
'name' => 'oauth2_generic',
'app_id' => 'gitlab',
'app_secret' => 'KEYCLOAK SECRET GOES HERE',
'args' => {
client_options: {
'site' => 'https://sso.brinformatics.eu', # including port if necessary
'user_info_url' => '/auth/realms/brinformatics/protocol/openid-connect/userinfo',
'authorize_url' => '/auth/realms/brinformatics/protocol/openid-connect/auth',
'token_url' => '/auth/realms/brinformatics/protocol/openid-connect/token',
},
user_response_structure: {
#root_path: ['user'], # i.e. if attributes are returned in JsonAPI format (in a 'user' node nested under a 'data' node)
attributes: { email:'email', first_name:'given_name', last_name:'family_name', name:'name', nickname:'preferred_username' }, # if the nickname attribute of a user is called 'username'
id_path: 'preferred_username'
},
}
}
]
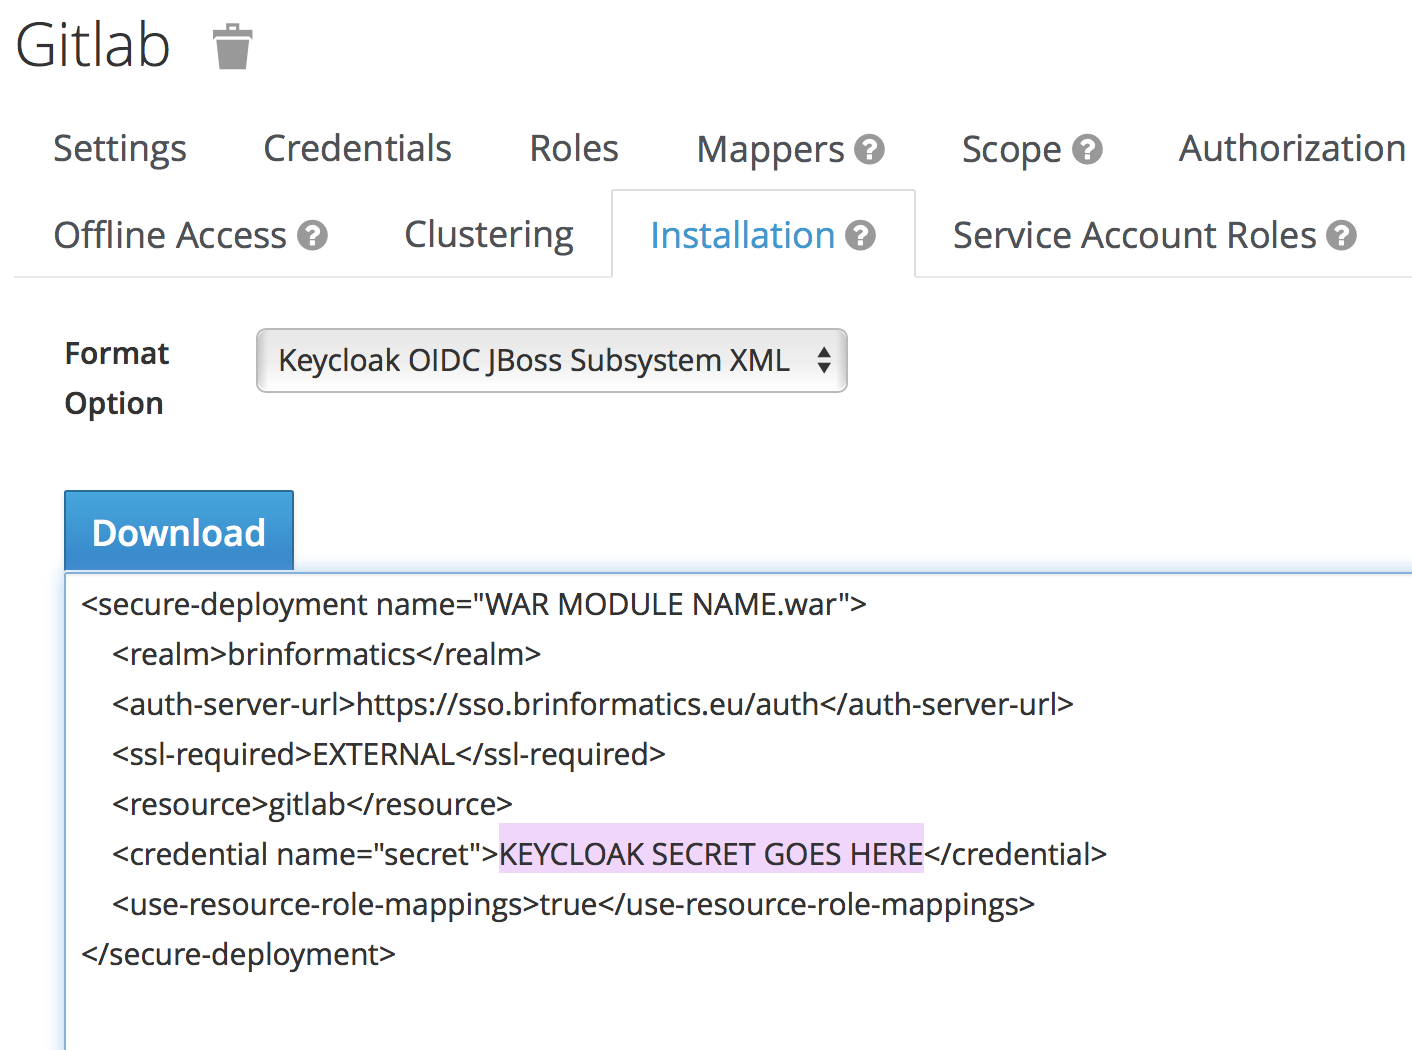
[/ruby]The app_id (l. 9) and app_secret (l. 10) should match with what you have configured in Keycloak (app_id = Client Id) or Keycloak has generated, steal it from the Installation page:
The configuration of the URLs (ll. 14-17) to connect to is important; the default will not work. You need to make sure the site_url matches yours and that the realm name in the other URLs is correct.
The response structure (ll. 19-23) is also important but can be copied verbatim. Note that the root_path (l. 20) is commented out; here we use the default. You can use another attribute for the id_path (l. 22) if you want.
In order to use this, we need to switch on
Users in GitLab and connect their account to an SSO provider at will:
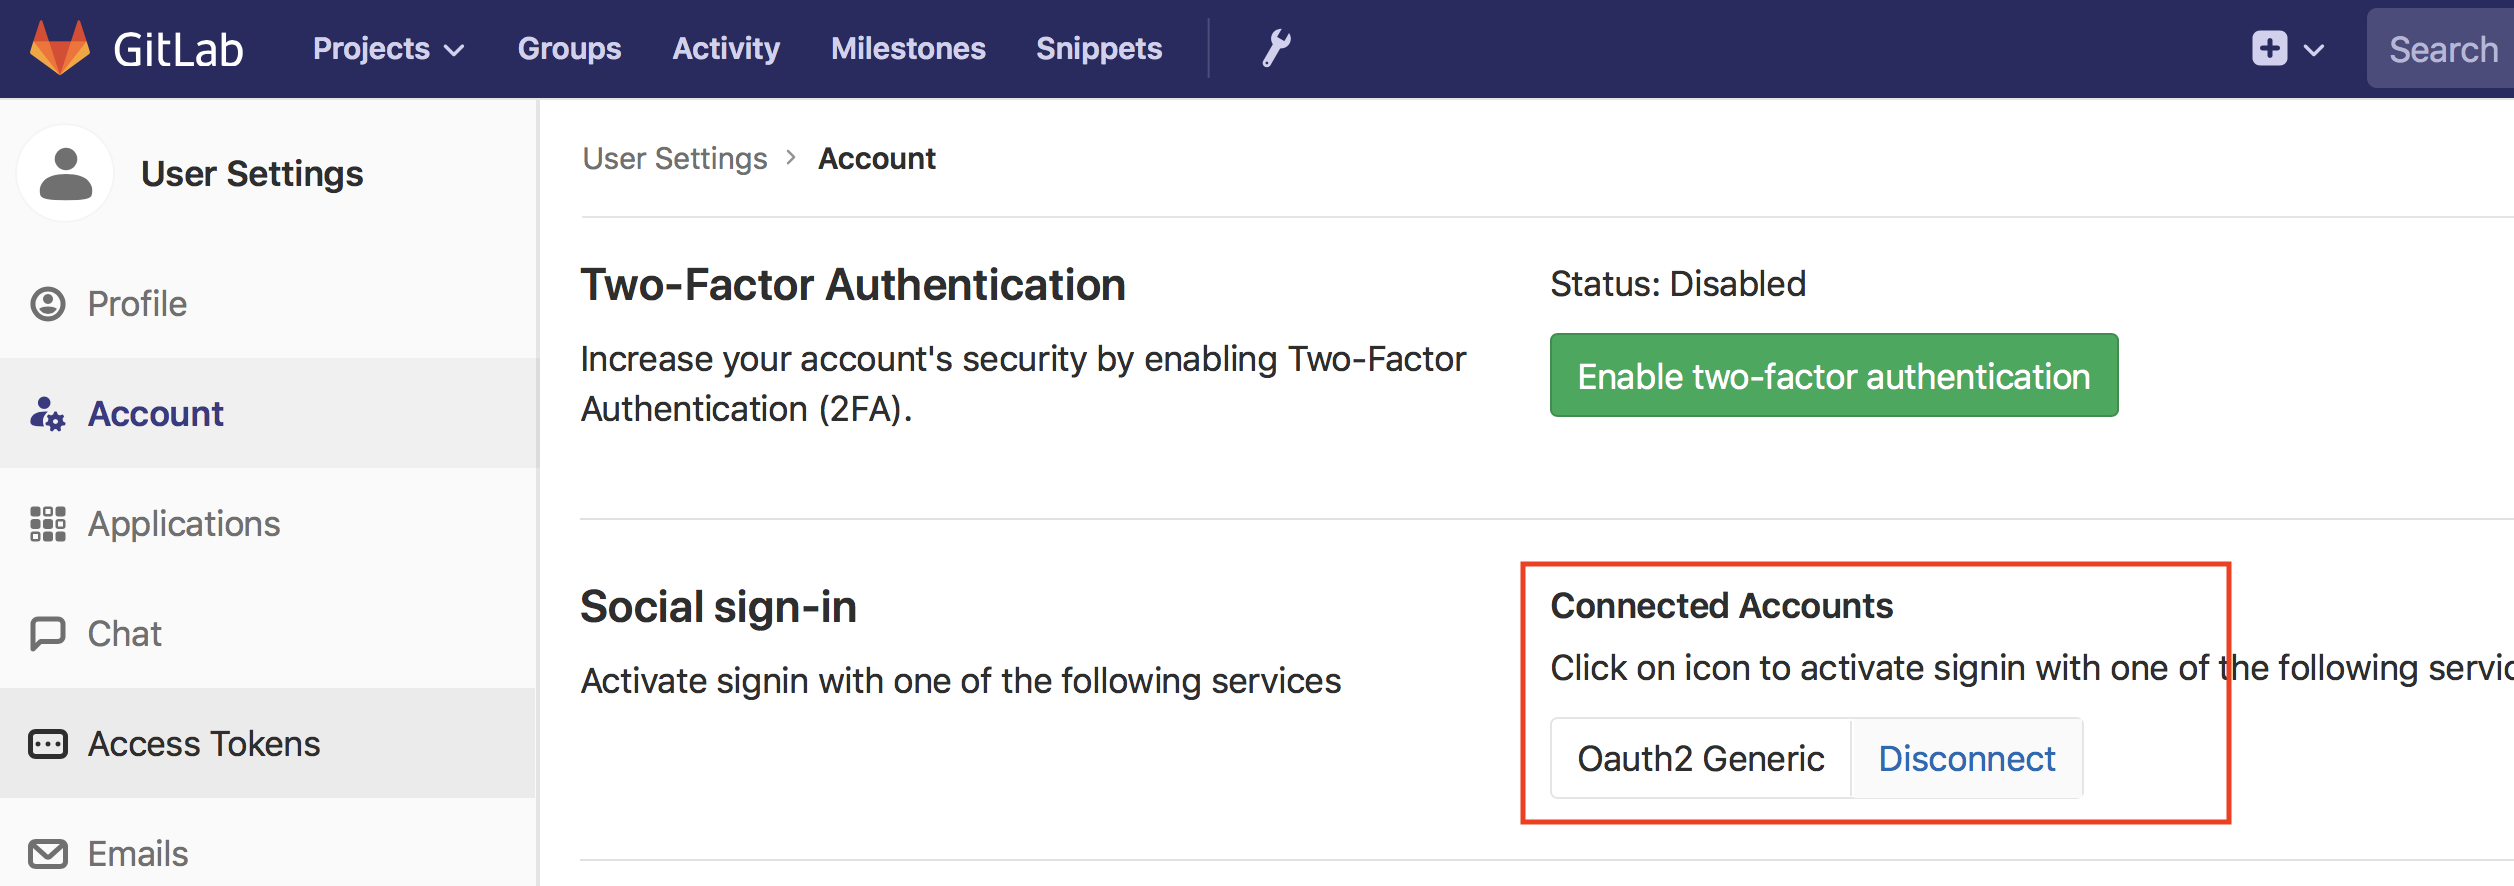
I used that to log in to my previously created account and link it to my SSO account during the transition. After the transition, I then added line 5 from the configuration to have GitLab automatically redirect to the SSO page instead of offering its own sign-in page. Without that line, users can log in using their accounts without SSO which is useful in a transition phase or if we allow multiple sign-ins and let GitLab perform the user federation.
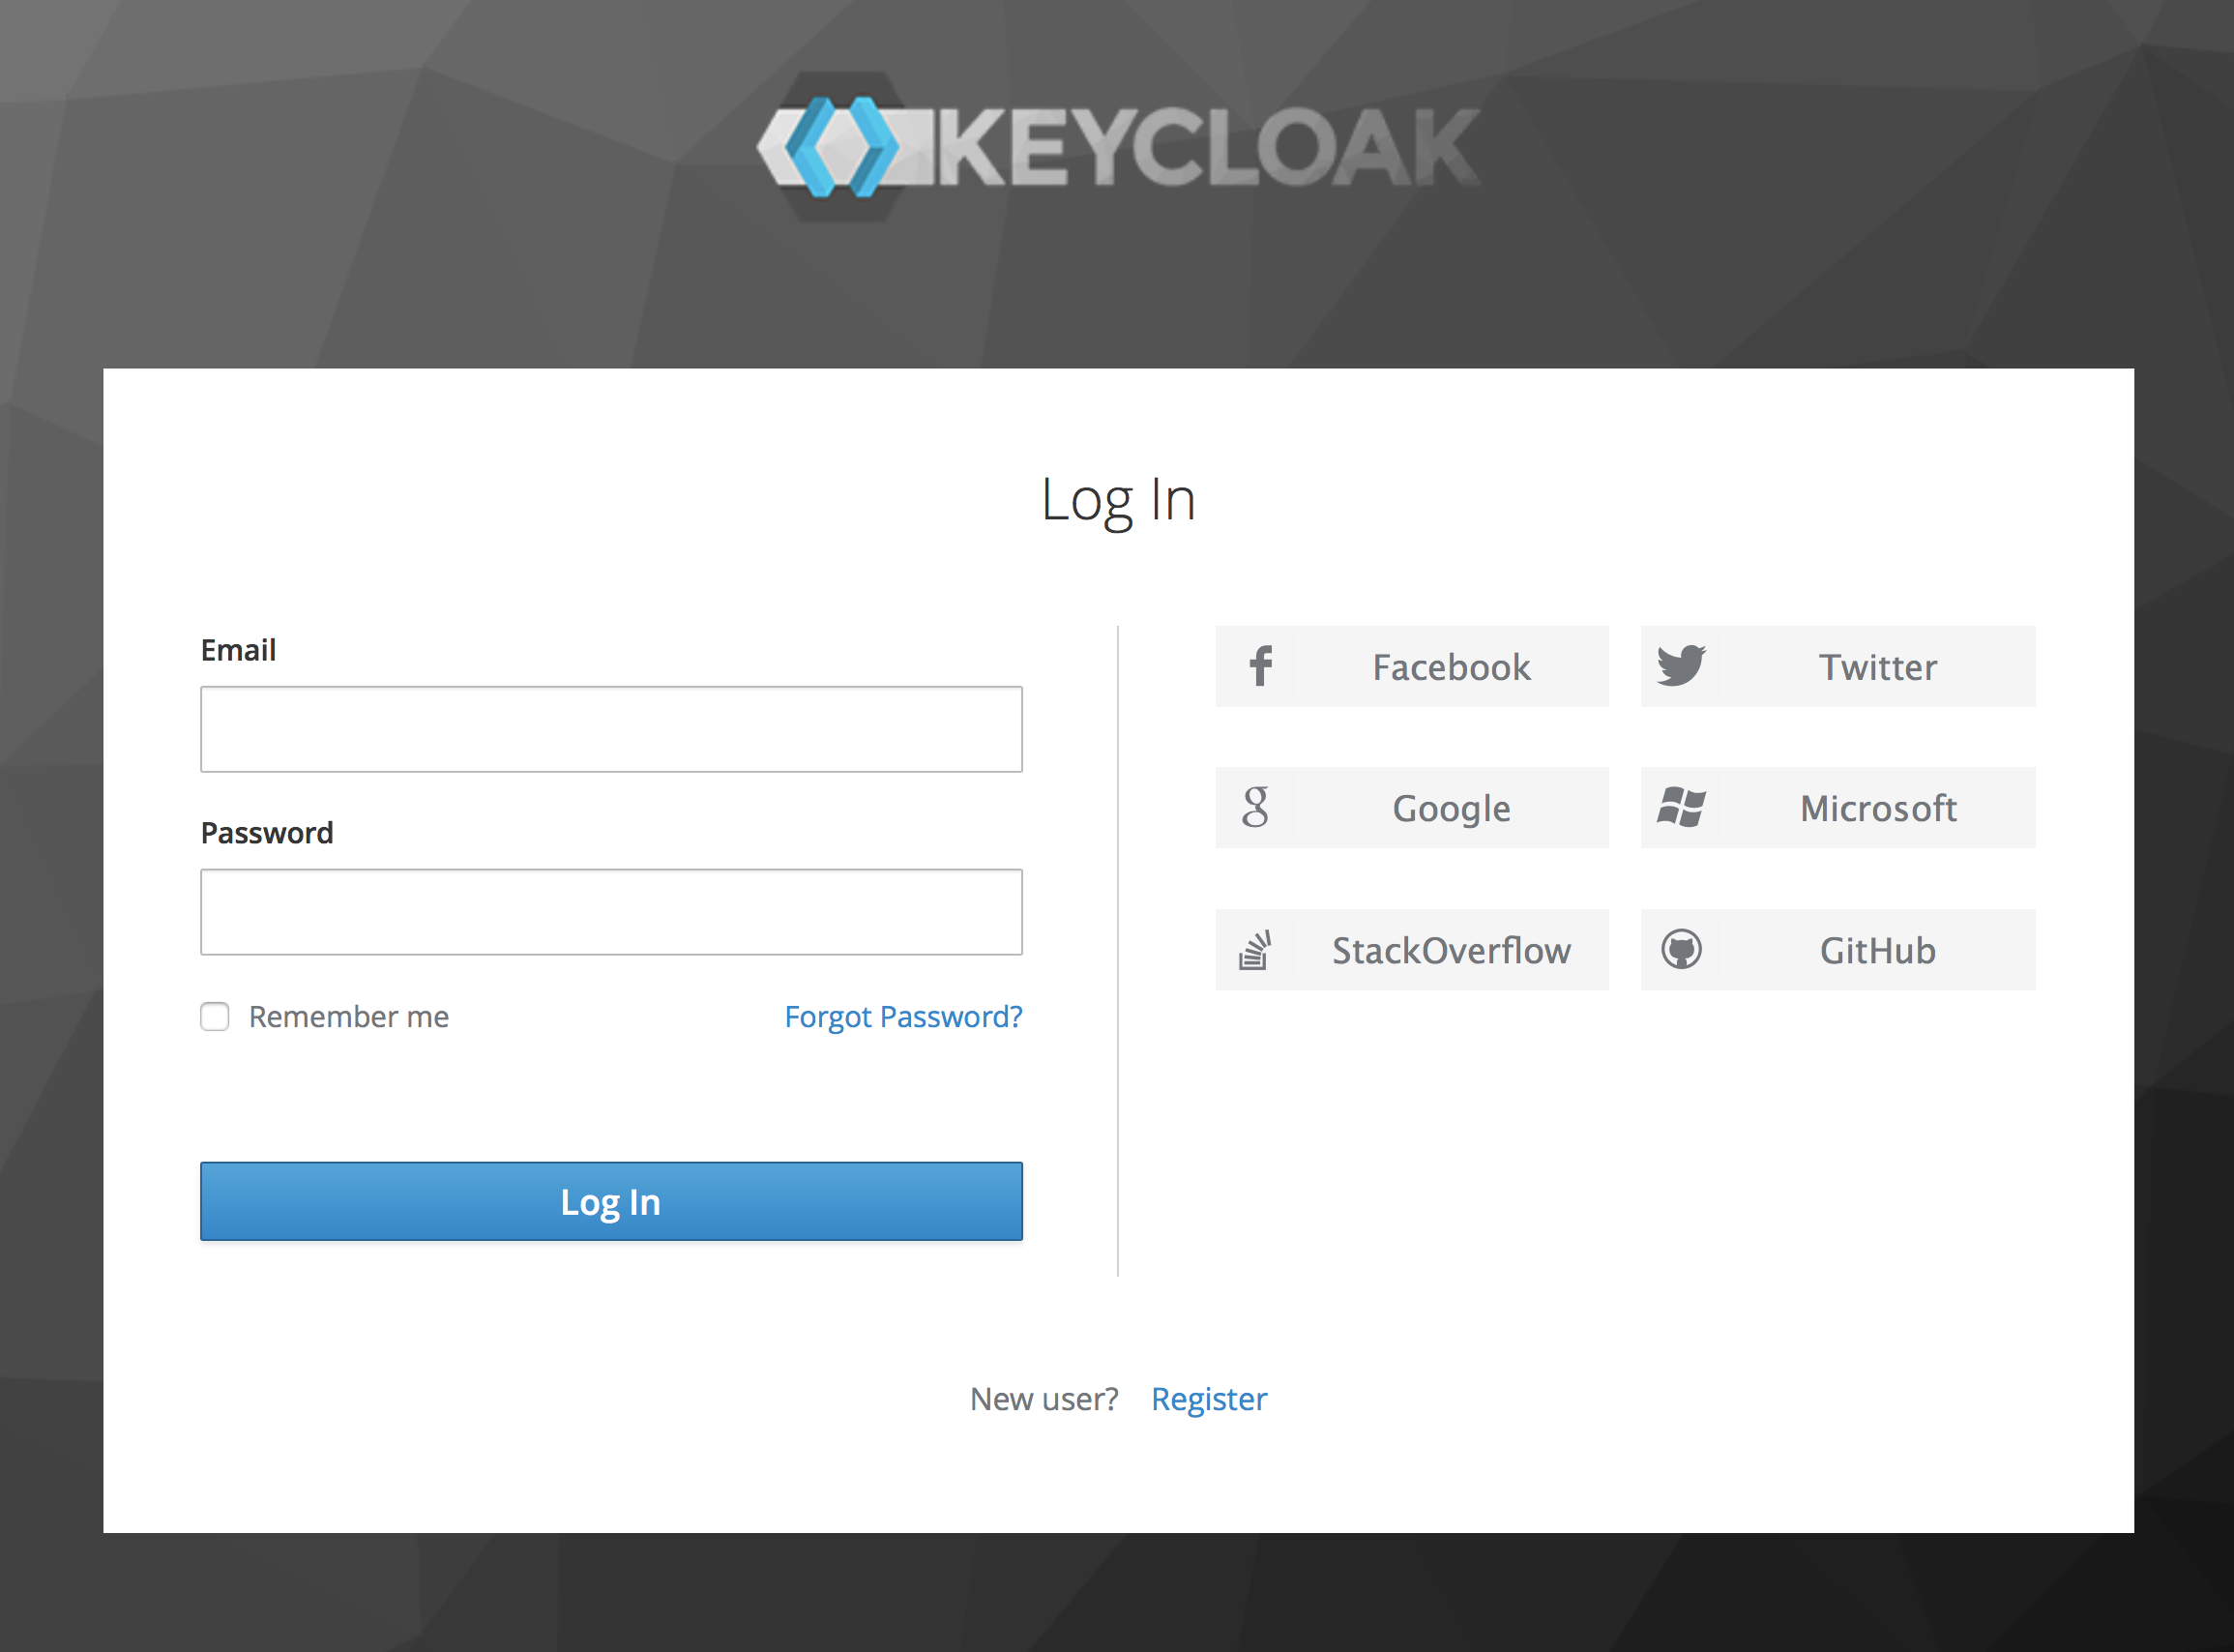
You can see the results on my GitLab server at https://gitlab.westergaard.eu/; it will just redirect you to the SSO page, where you can create an account should you so desire (either using the Register link or any of the social media identity providers).
My biggest problem with the integration is that you have to pay for the GitLab enterprise edition to be able to configure credentials from the SSO; as it is, I have to configure permissions inside GitLab which to at least some extent
WordPress
Getting WordPress to play nice with Keycloak was at the same time harder and easier than getting GitLab working. We again have a choice between either SAML or OpenID Connect, and have a choice of 4 plug-ins that in principle can make things work for you: MiniOrange’s SAML SSO plug-in, OneLogin’s SAML SSO plug-in, MiniOrange’s OpenID Connect plug-in, and the OpenID Connect Generic Client plug-in. The MiniOrange offerings genuinely look great – they even have a guide specifically for connecting to Keycloak.
The
The OneLogin plug-in relies on a third-party identity service. Which is probably fine, but I’m not running Keycloak just to have all logins filtered thru another third-party service as well.
The remaining option is the generic OpenID Connect plug-in. It’s open source and in general, works fine, with one caveat which we’ll get back to.
For WordPress, my Keycloak configuration looks like this:
This is set up in WordPress like this:
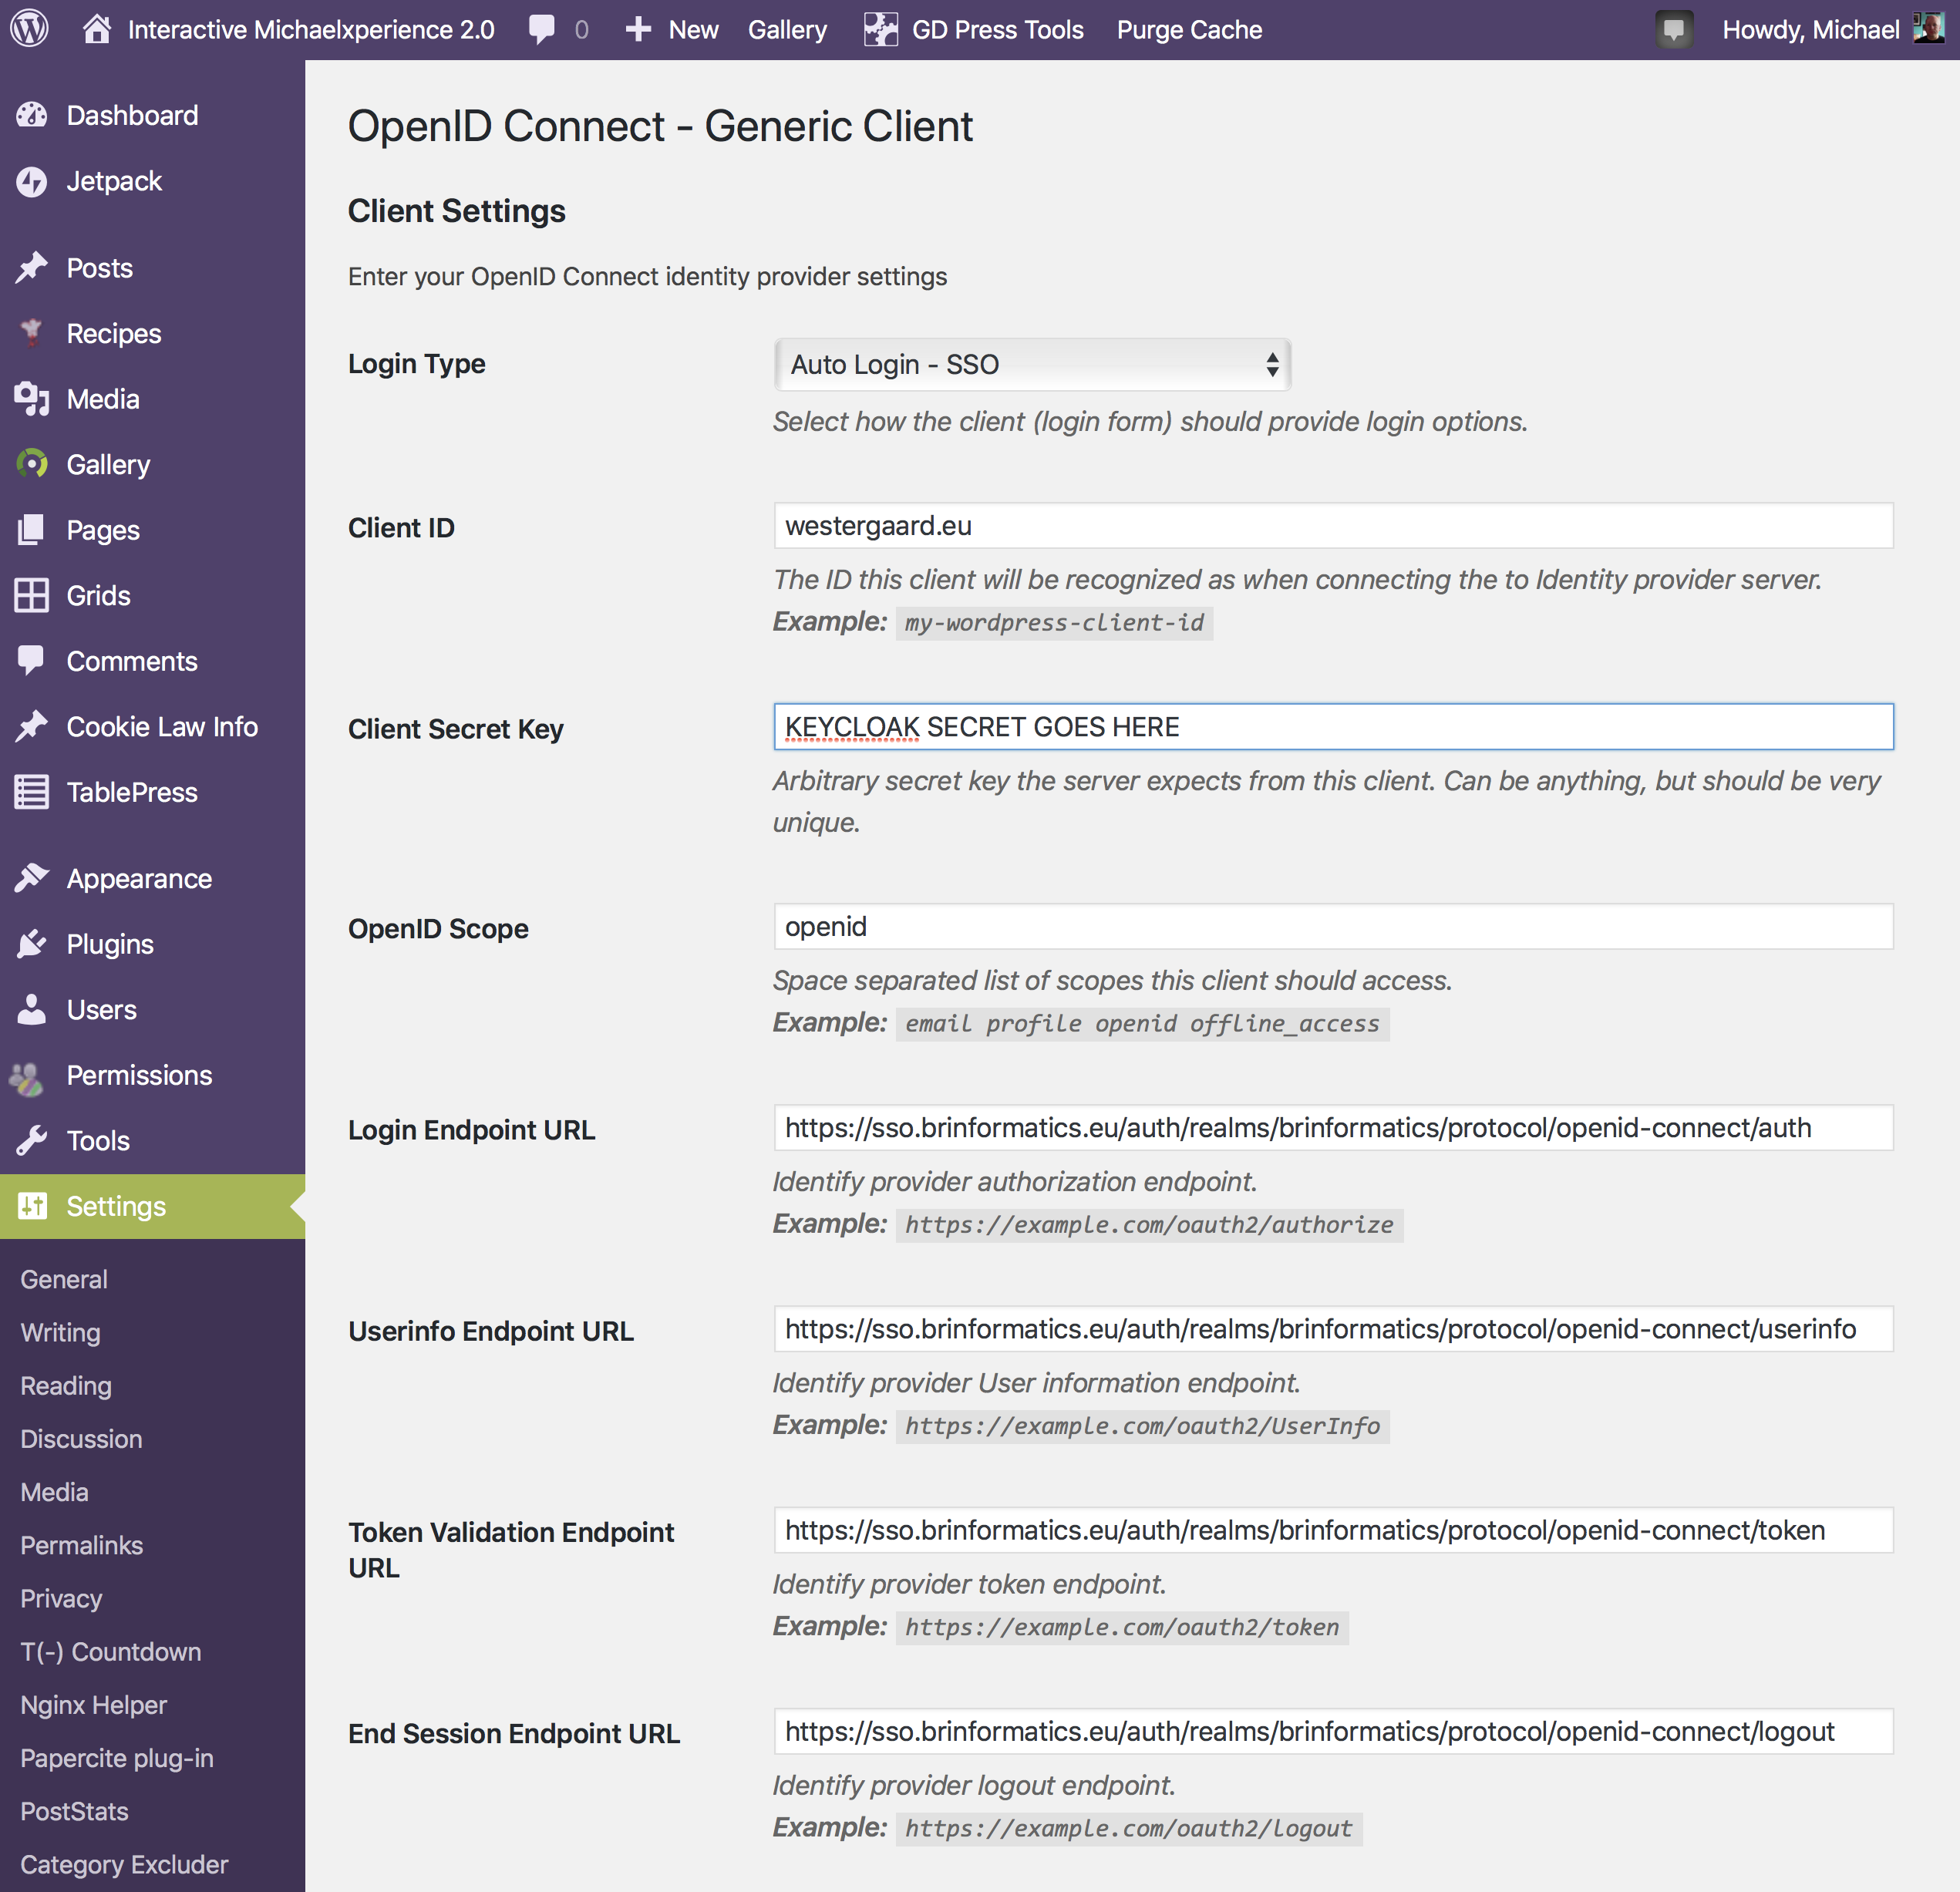
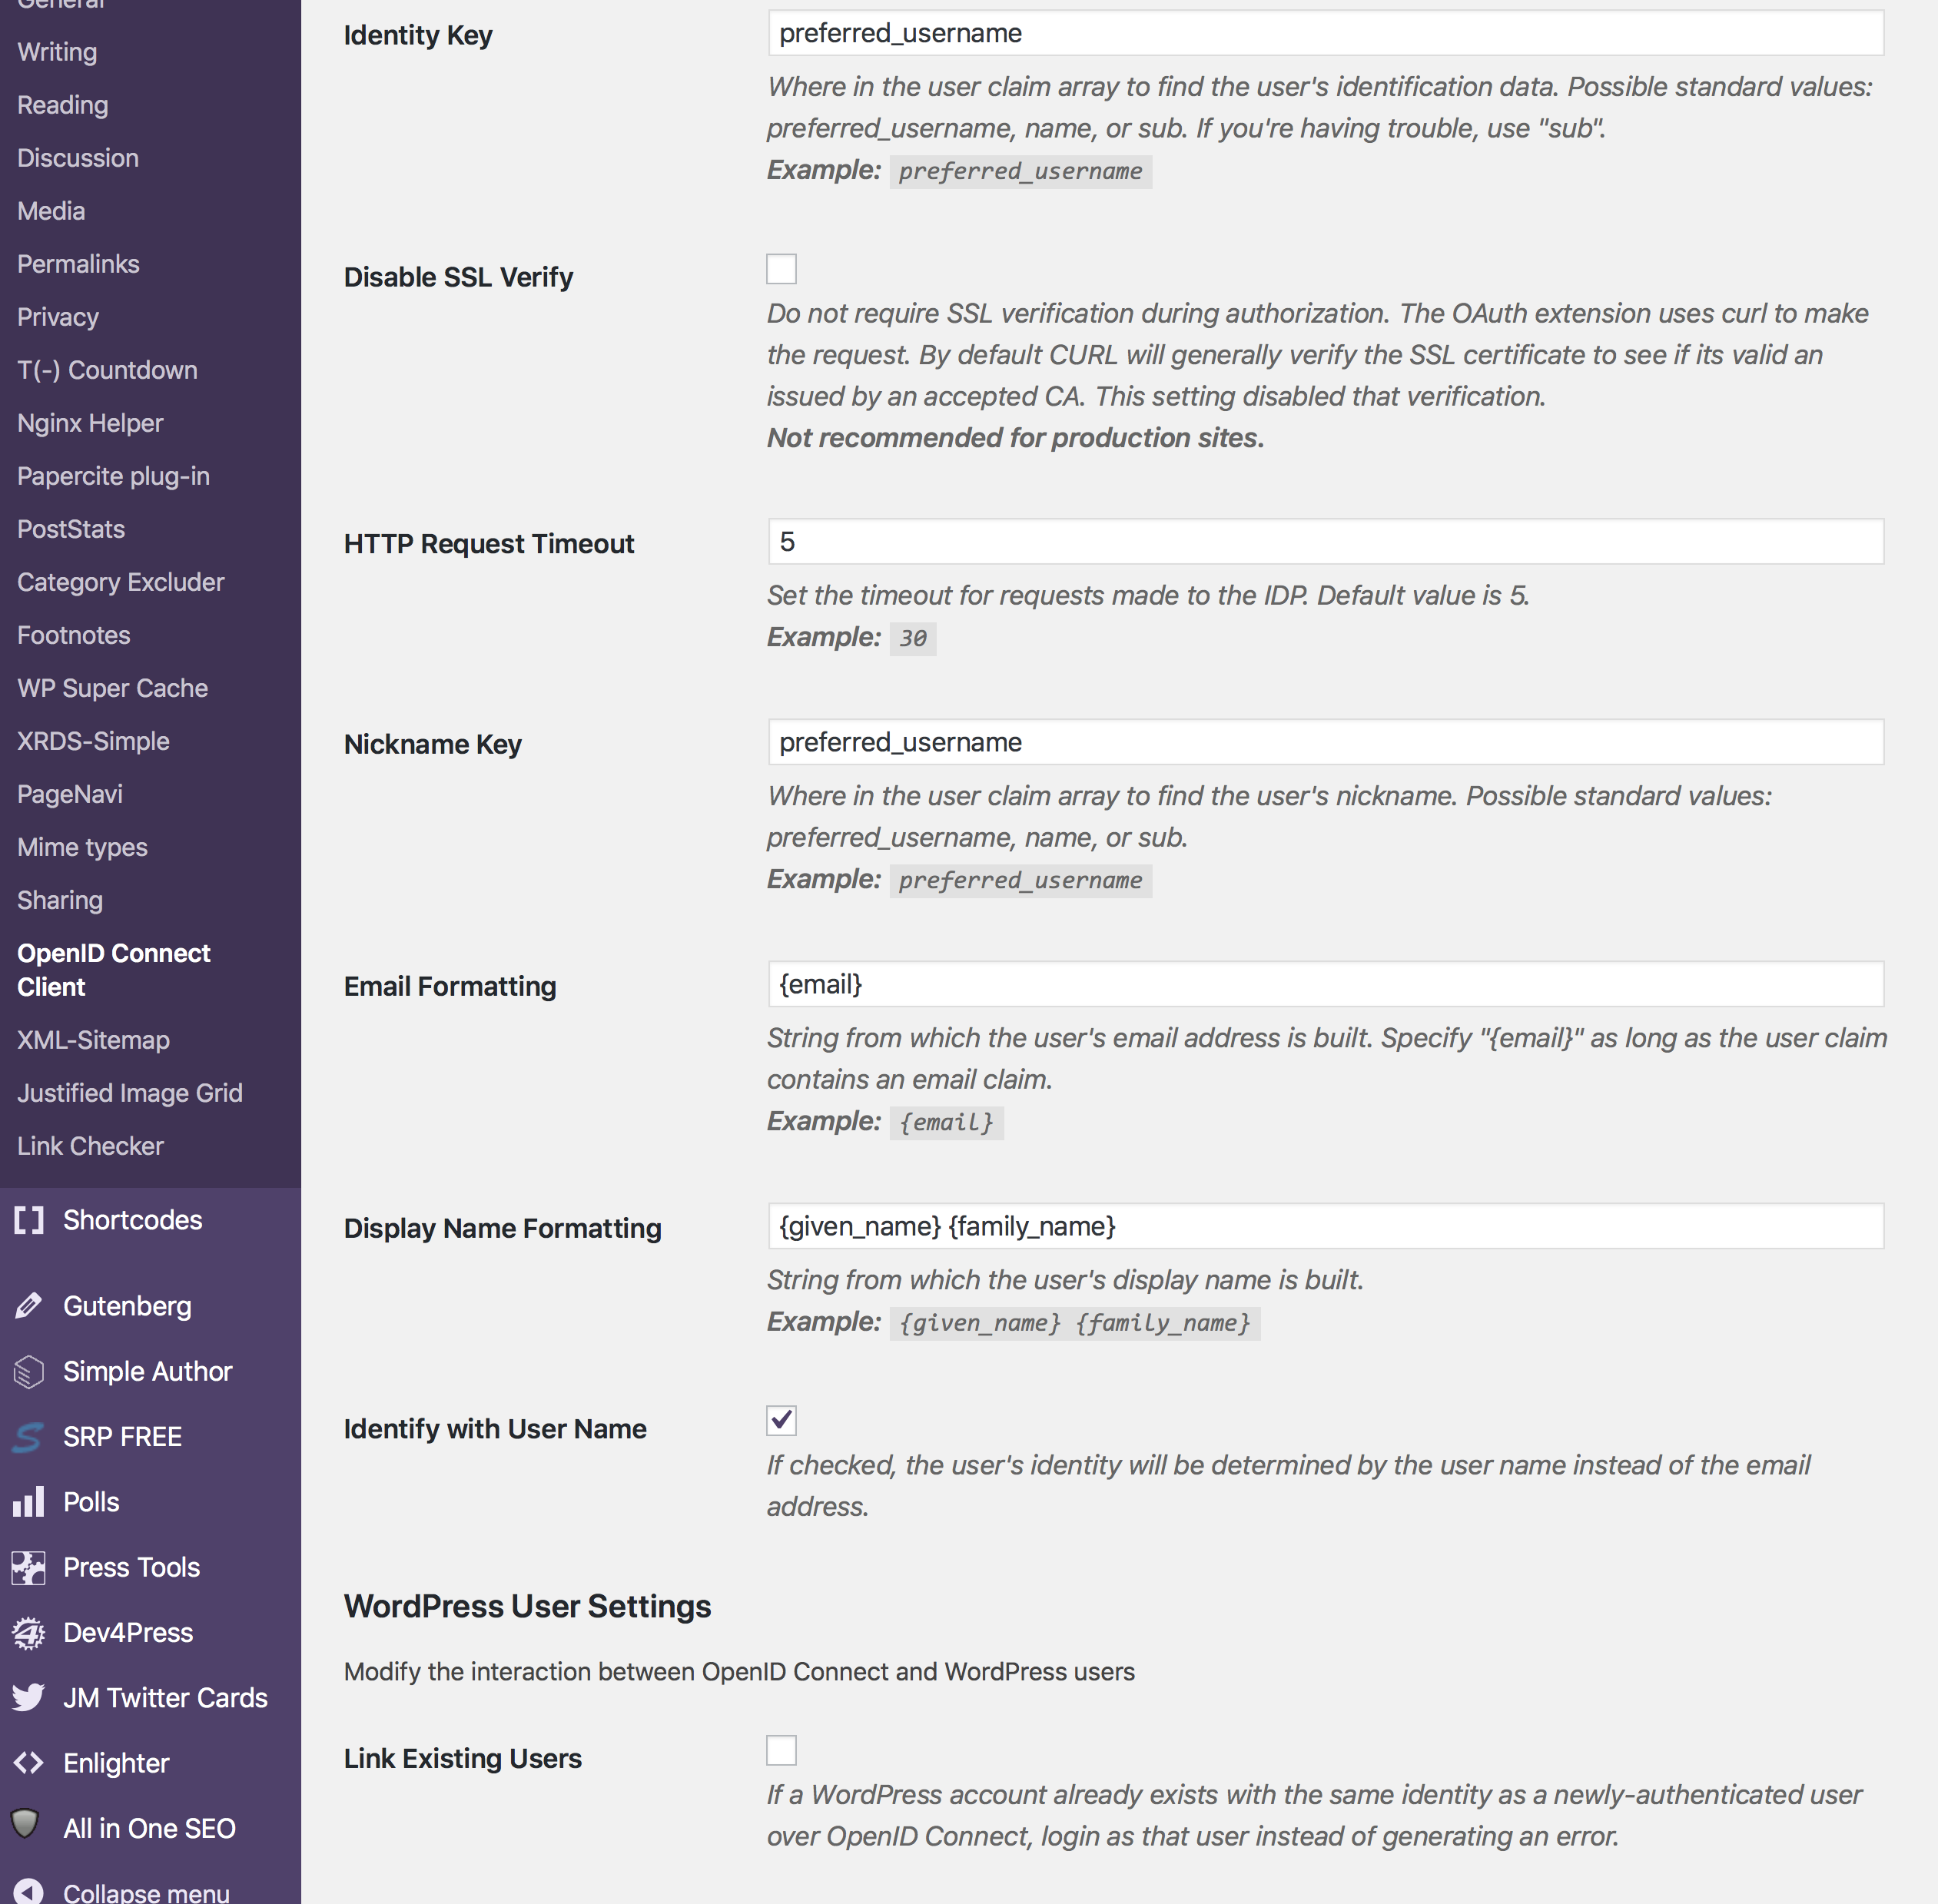
We just need to set up the endpoints and double check a few of the formattings (I had to change the Display Name).
What is really important in my case was the Login Type at the top. Like the GitLab integration, this plug-in can add a button to the existing login form or it can work in full SSO mode (i.e., redirecting users to the SSO page instead of displaying the regular login page). The user I have used for most of the time while using WordPress has a different
After switching to SSO mode, I discovered that my blog has become incompatible with my 2FA plug-in of choice, Duo Security. I disabled the plug-in and moved on to the next section.
2FA using Duo Security
Keycloak comes with its own support for 2FA. It is probably fine – I have never actually used it – but I assume it relies on the same 2FA standard everybody else uses, which would force me to scan a QR code using an OTP generator and generate and enter an OTP every time I wanted to log in. Like some sort of caveman.
I have relied on the 2FA solution from Duo for a long time. It’s truly great. I have used it for my blog and for protecting ssh logins to my servers. What is so special about Duo is that in addition to the regular 2FA options (OTP using SMS, call or generator), they also support just sending a push notification to my phone or watch; I just click approve and I’m immediately logged in. So much less effort than having to find the right generator and typing in the password or waiting for a text message to arrive like we all still lived in the 90s and logged on to Geocities page suspiciously still under construction.
In addition, the 2FA of GitLab is atrocious. It allows you to use a standard OTP generator, but that means you can no longer authenticate
All in all, I wanted a simple 2FA based on Duo in my SSO. It turned out, that somebody recently actually made just that. The installation instructions are spot-on and the only small
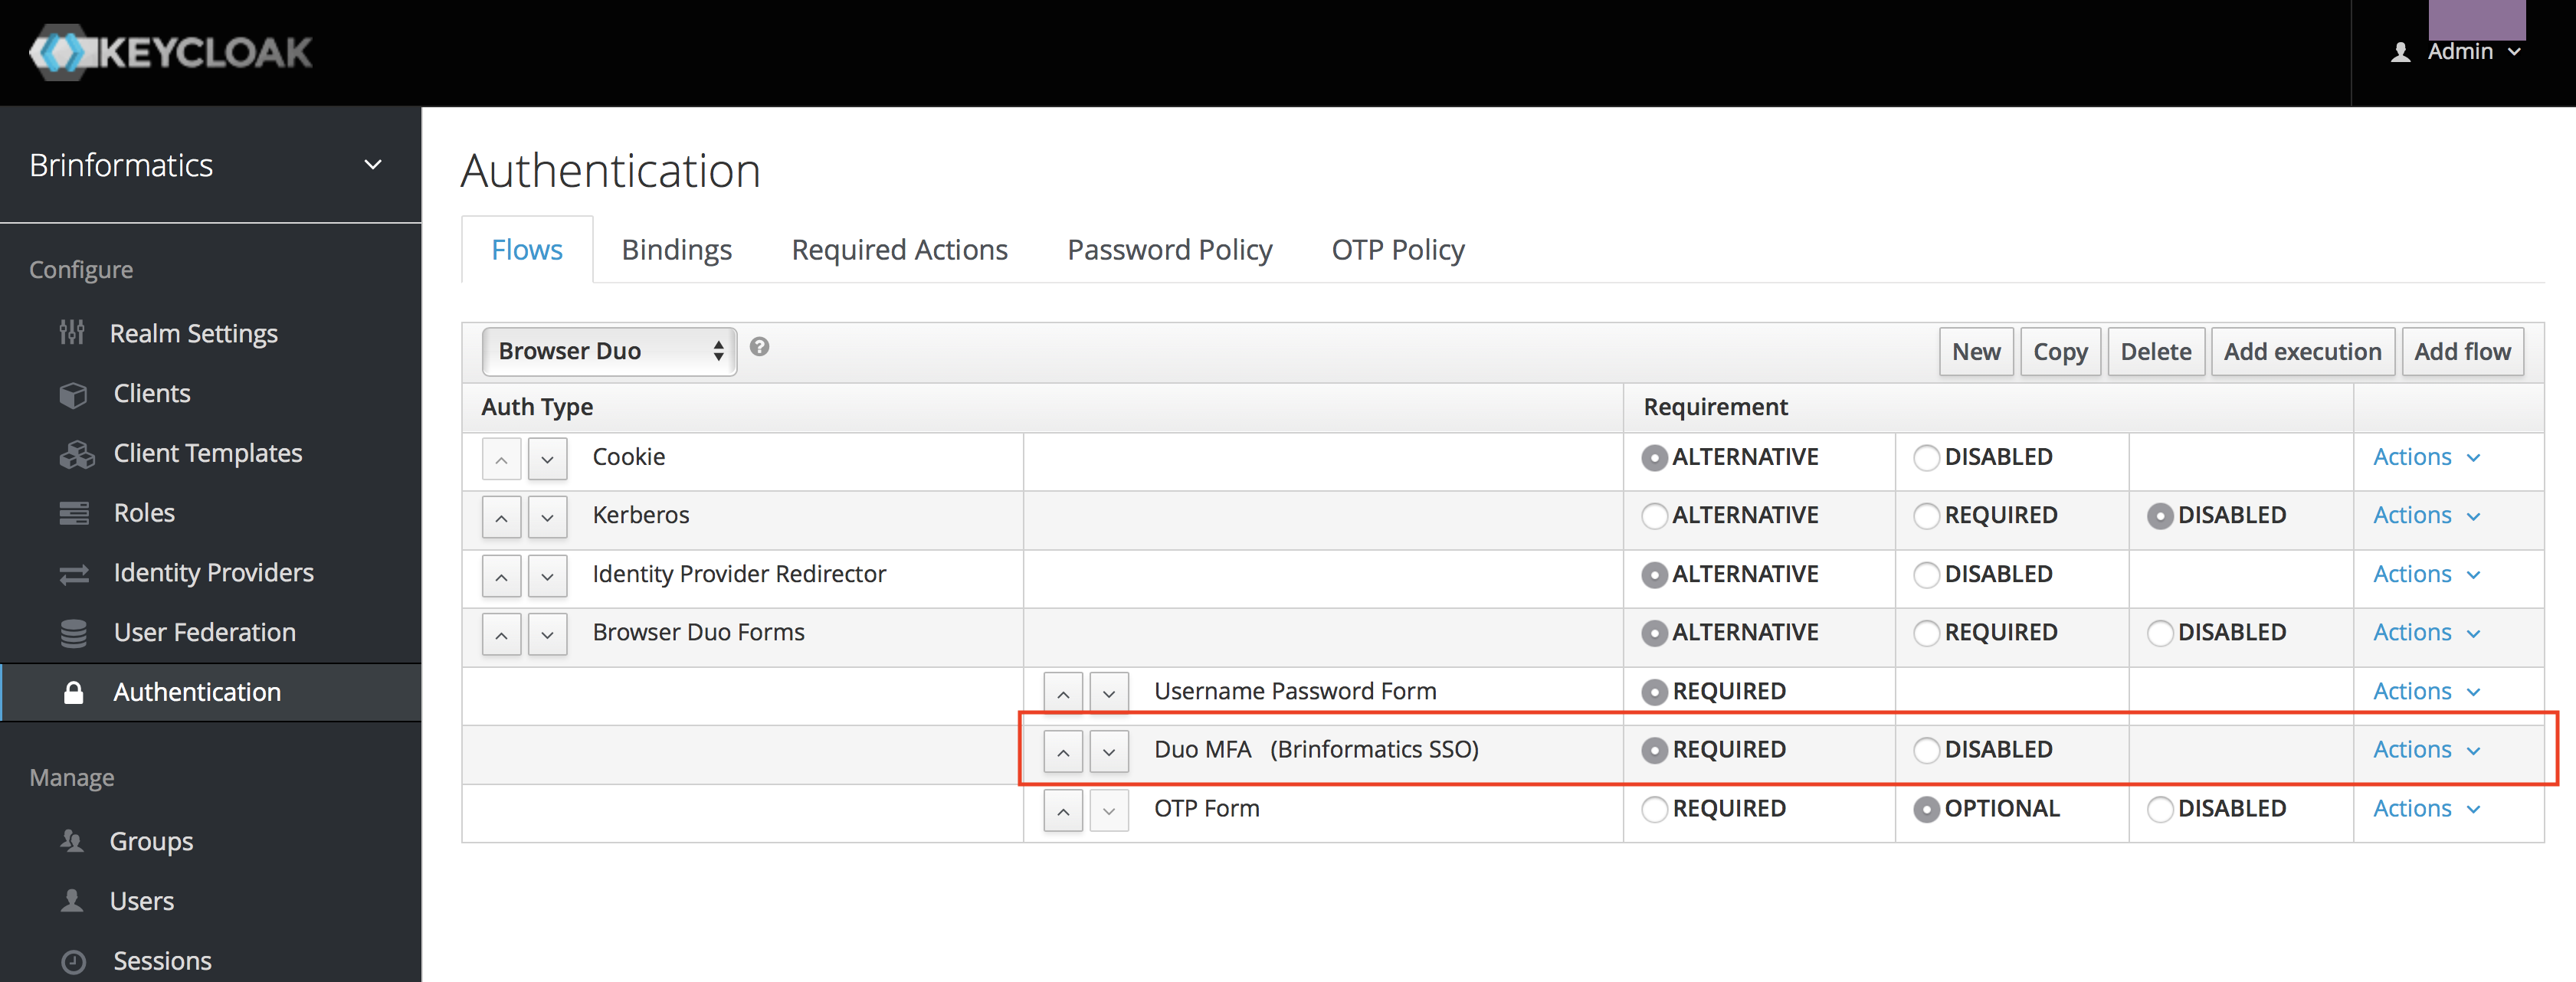
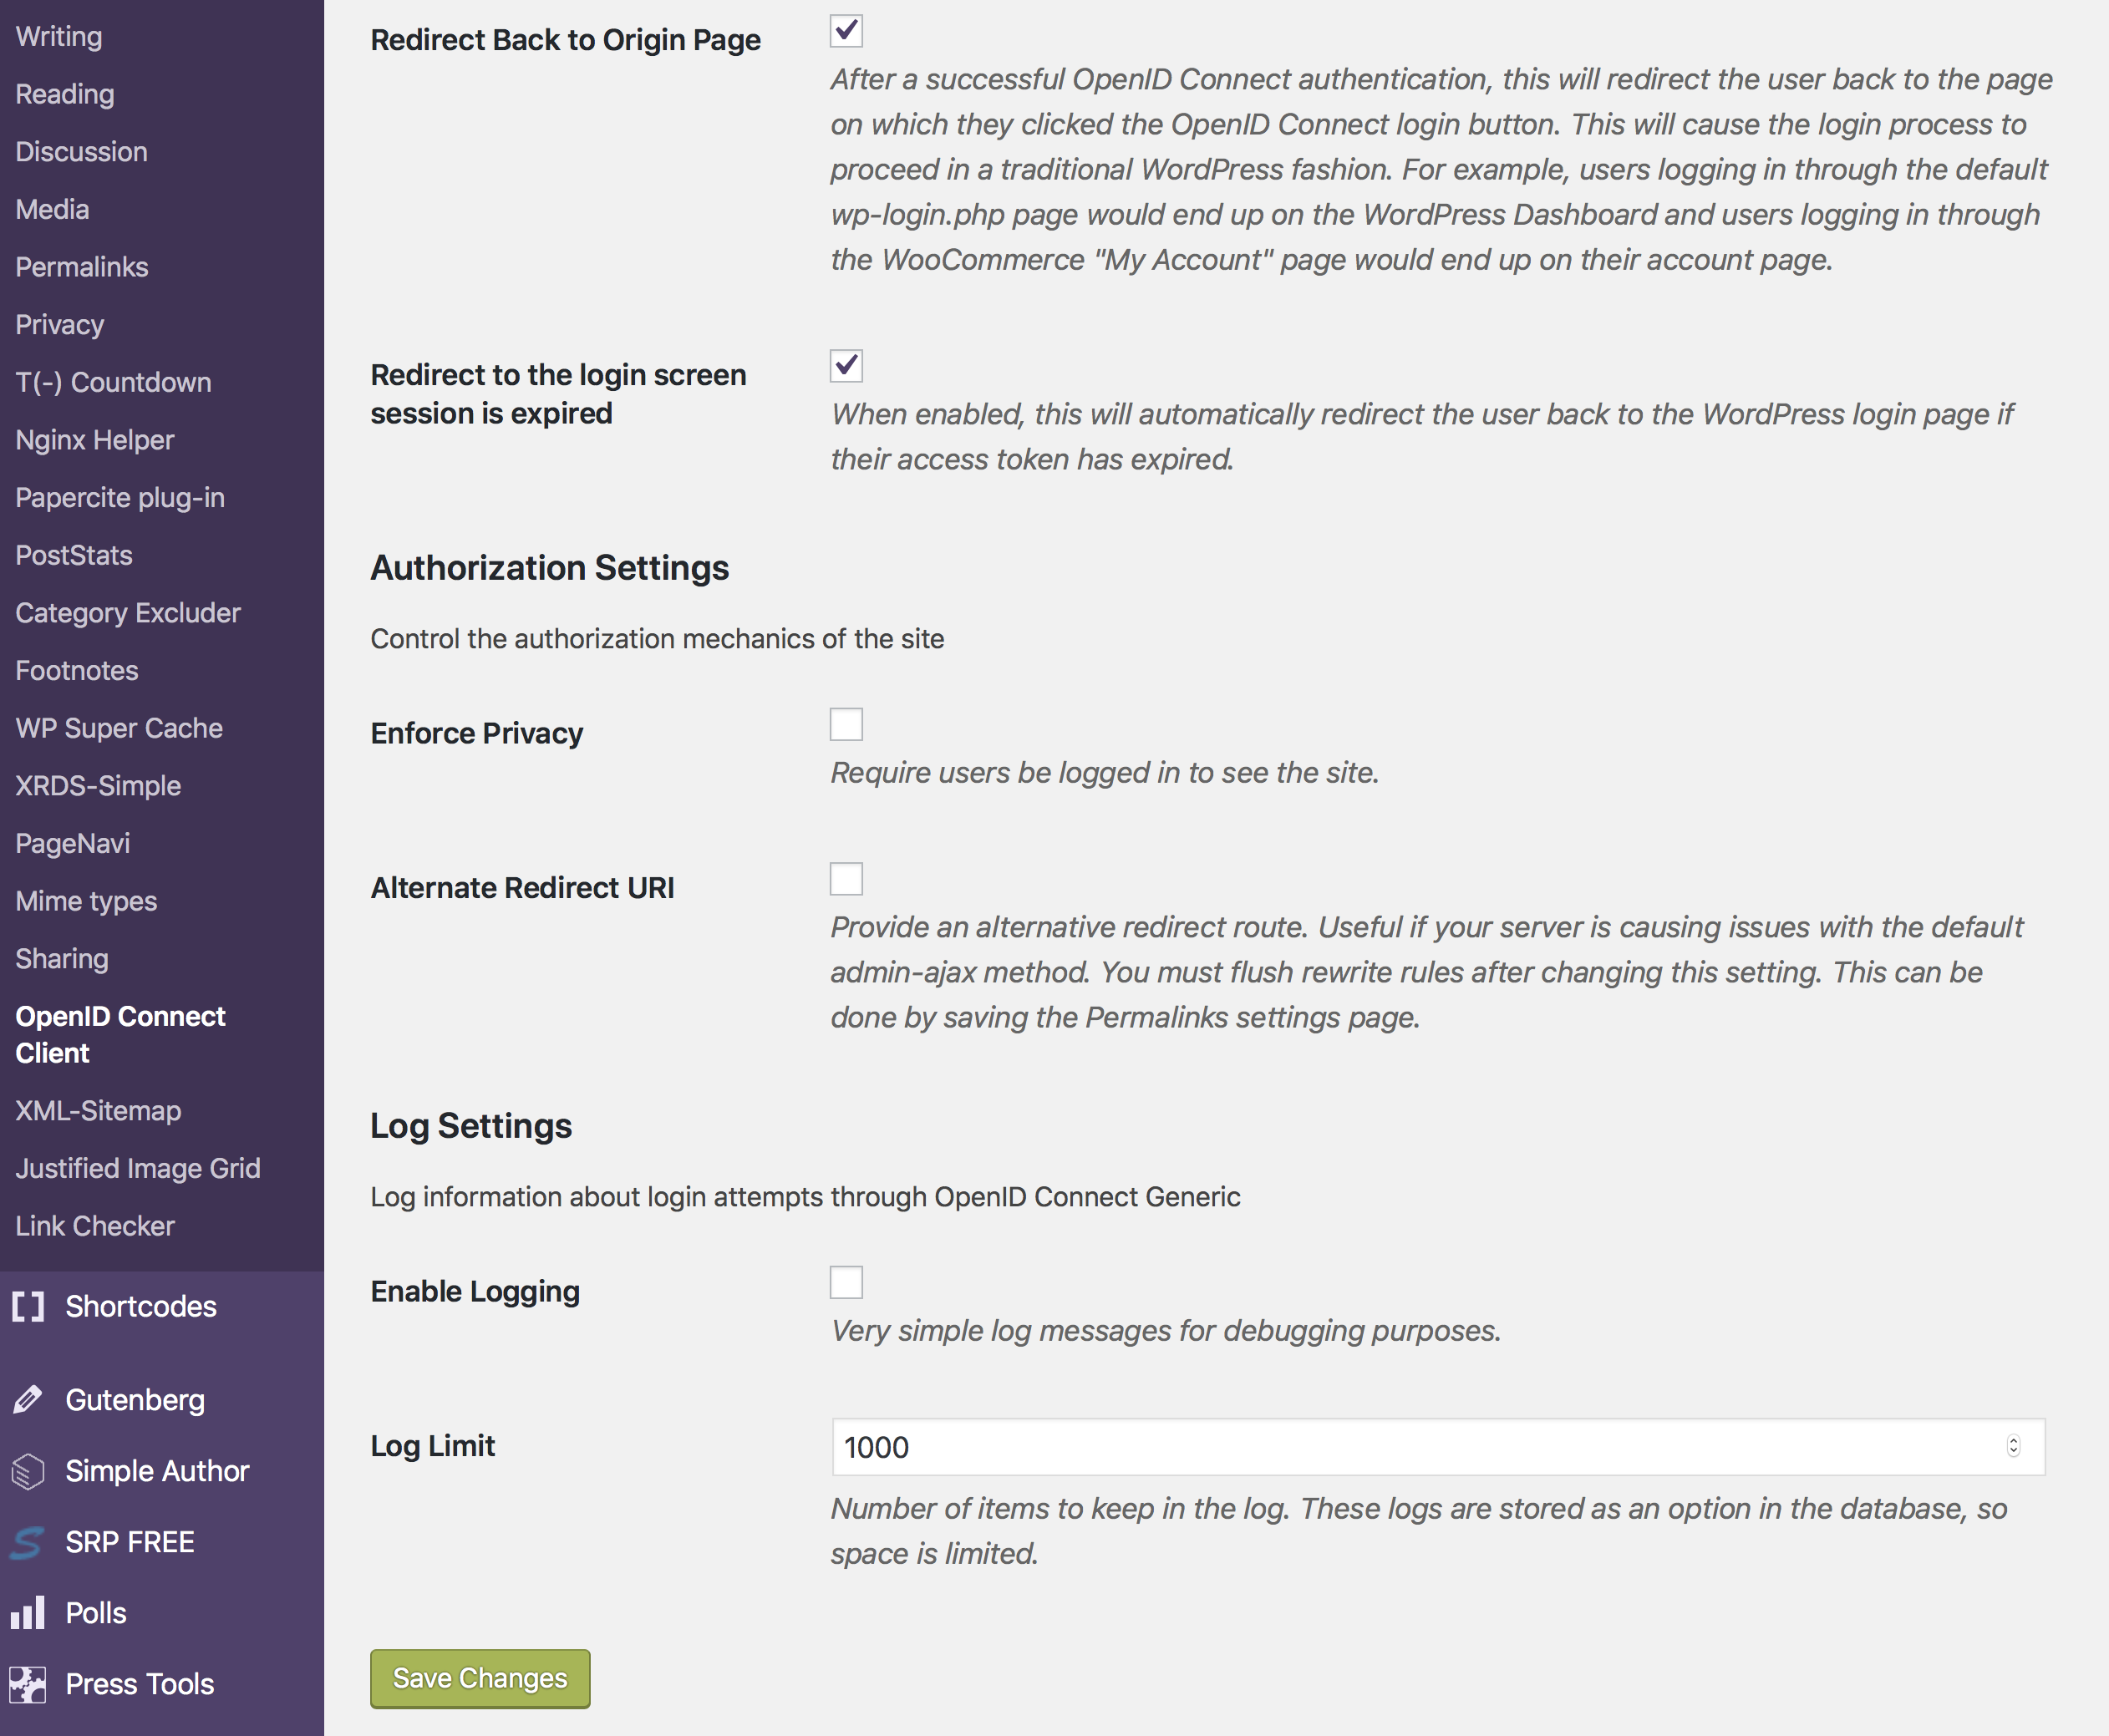
I switched the default browser flow for my realm to the new one:

Like something straight out an Apple keynote, that was it: it just worked. Now, I can log in to my sites using my preferred 2FA solution. I switched off 2FA in WordPress and GitLab which means that SSO works in WordPress and I don’t have to bother with application-specific passwords in GitLab if I don’t want to.
Conclusion and Wish List
In conclusion, using Keycloak worked really well. I have used it for some of my hobby development projects as well, and it is very easy to work with there.
I am missing a bit more centralized configuration of user roles; while Keycloak has support for it, GitLab has hidden it behind a pay-wall and my free WordPress plug-in doesn’t seem to support this (the MiniOrange ones seem to, though).
I would also like to protect some of my other services using the SSO, but Artifactory hides SSO behind a paywall as well, and I will have to look into how to make SSH authenticate using an SSO solution. I have already migrated some of my hobby projects to Keycloak (that’s why I set it up in the first place), but my mobile site is still using my own old home-brew PHP solution from more than 10 years ago.

Hello
We want to do SSO for the application deployed on Wildfly Instance and we want to use the SAML standard and keycloak .
We don’t have website name yet . We have the host number and port and application we deployed is jenkins.war file on our wildfky instance . For more information please email me.
Our app url is like this
http://host no:port no/jenkins
Hello,
We have successfully integrated Gitlab with Keycloak looking at this post.
But users are unabled to signout from Gitlab (they are always logged). Do you have this kind of problem ?
Best regards,
Fabrice
Hi Fabrice,
That is correct. The reason is that OAuth2 does not support “single sign-out.” So when you click sign out, you are indeed logged out of Gitlab. Gitlab the redirects you to the sign-in page, but the sign-in page directly redirects you to the SSO sign-in page. The SSO sign-in page realizes you are still signed in using SSO and redirects you back to Gitlab, signing you in again.
Since the OAuth2 protocol does not directly support single sign-out, all you can do for now is hard-coding the logout to also redirect you past the sign out page of Keycloak. I have not experimented with this personally.
A better option is to wait for OIC (OpenID Connect) support in Gitlab. It has been requested for long and dormant for most of the time (see https://gitlab.com/gitlab-org/gitlab-ce/issues/23255), but it seems that recently there has been push to move that into the release. I expect that proper OIC support should help. Alternatively, you can enable OIC support yourself, but be aware that patching Gitlab is a bit of a pain to do for each update (I did that for a couple years for MySQL support).
Regards,
Michael
Hello
We want to do SSO for the application deployed on Wildfly Instance and we want to use the SAML standard and keycloak .
I’ve done the changes suggested in the below link but still not able to redirect to keycloak login page.
https://access.redhat.com/documentation/en-us/red_hat_single_sign-on/7.0/html-single/securing_applications_and_services_guide/index
kindly assist
Thanks Michael! Even today this is the perfect instruction for an easy and fast setup of keycloack with WordPress. Awesome!