The past weeks, I’ve been writing about my approach to model-based testing. Model-based testing is a methodology ((You can tell it’s serious business because it’s a methodology and not just a method or a tool.)) where you don’t focus on inferring logical test-cases, but instead try to abstractly describe the system under test, and instead let a computer systematically test it. I argued that the method is unable to connect with industry, and proposed a solution in the form of a tool, the MBT Workbench.
Last time, I talked about MBT Workbench, I described the overarching approach: an abstract representation of the test cases are mapped to input parameters for the system under test in the form of a web-service. Concurrently, the input parameters is passed to an abstract but executable model of the system The output from the service is mapped back to the abstract domain, and compared with the output of the model. For this, we need 4 artifacts: the service description, an input mapping, a model, and an output mapping.
The innovation of the MBT Workbench is the way in these 4 artifacts are created. I went over the meta-model in detail earlier, but it is worth repeating, since we this time will see how the meta-model is implemented in the tool:
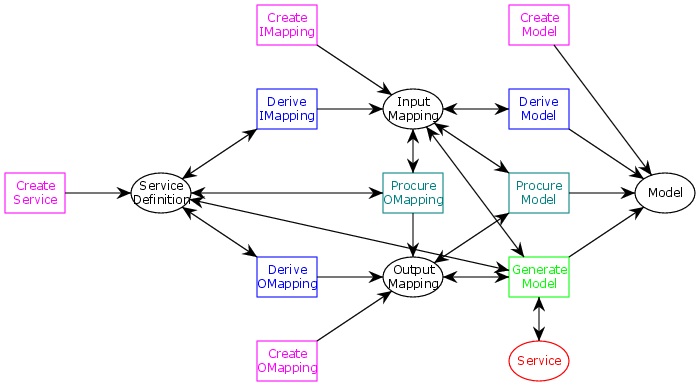
The meta-model is created as a colored Petri net (see previous post for more detail). We see the 4 artifacts, and how we can derive some artifacts from other in more or less automatic ways (magenta being manual, blue tool-assisted, teal semi-automatic, and green fully-automatic). Last time, we looked at how the MBT Workbench assists the user in deriving an input mapping from a service definition. This time, we will look at what input mappings look like and how they can be created inside the MBT Workbench, and we’ll also take a look at how the entire meta-model is implemented.
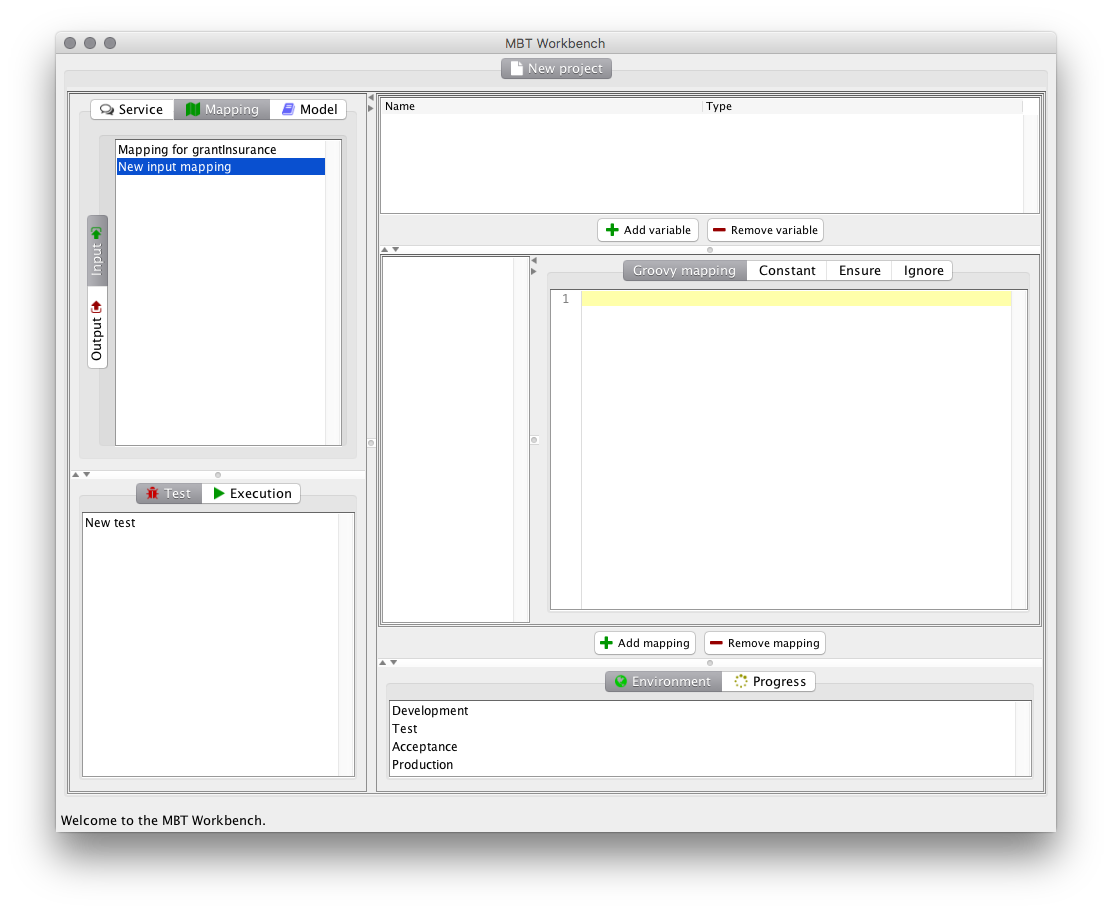
Let’s start from the end. Now, when you start the MBT Workbench and create a new project, you are no longer greeted by the empty screen of yore. Instead, we see the tool automatically creates a first test and shows us the test editor. The test editor directly implements the meta-model (in more ways than once as shall become evident).
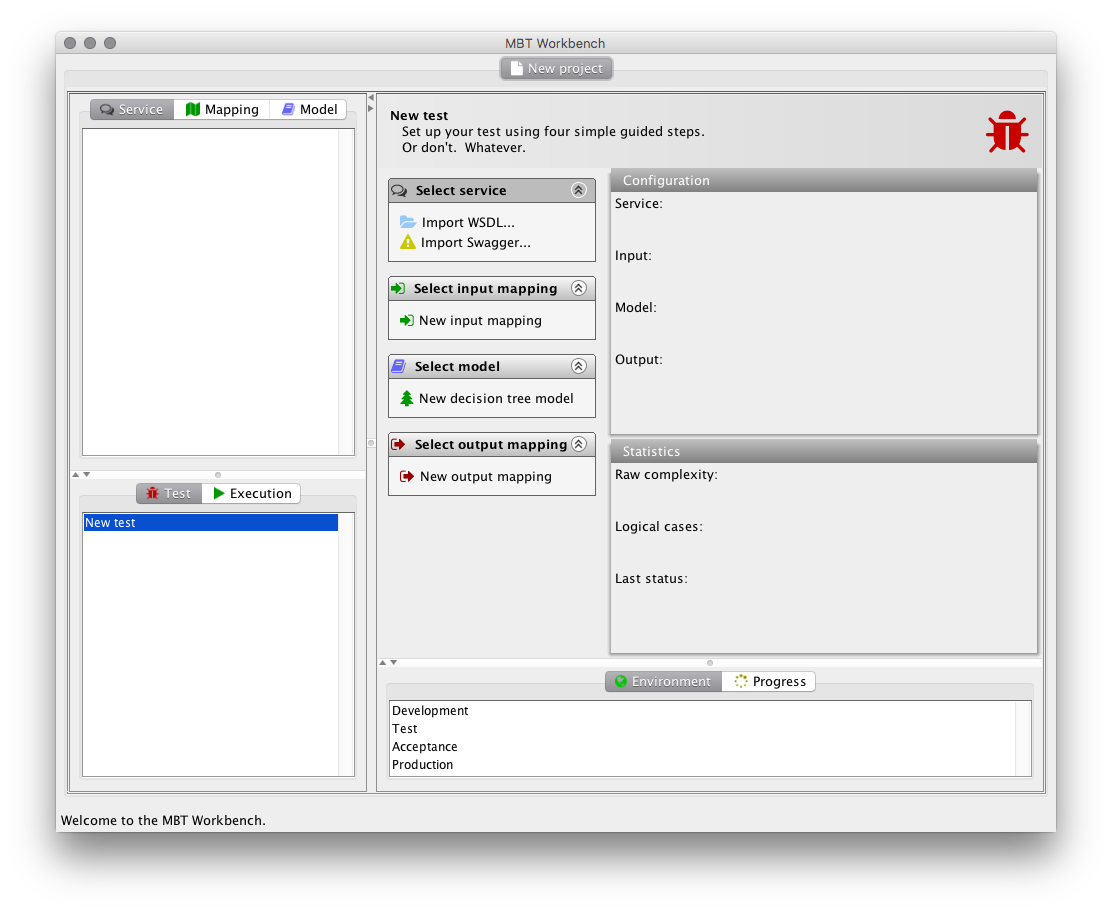
This is done because the user is not expected to care about meta-models or methodologies, but rather about testing. The tool, like the meta-model, does not impose an order of doing things, but instead allows users to do anything that is possible at the present stage for the current test. The user is presented with 4 task lists, one for each of the 4 artifacts. The task lists might expand during the tool use, and will automatically collapse when they have been completed.
We start out with no artifacts defined, so the only options we have are to create artifacts. This corresponds to the 4 “Create” transitions of the meta model. We can import service definitions in multiple languages, and we use the application terminology “New” instead of “Create” for artifacts (and “Import” for service definitions, as they have to be defined elsewhere).
The tool proposes starting with a service definition, so let’s import the same WSDL representing the insurance example from last time. A company grants car insurances, but not to sub-25 men as they are a hazard. Therefore, they require that customers specify age and gender on their application. The screen is (almost) identical to what we saw last, except it now helpfully highlights not fully specified fields in red:
Mapping the age enumeration defined by equivalence classes based around the age 25 being important, the tool allows us to generate the input mapping:
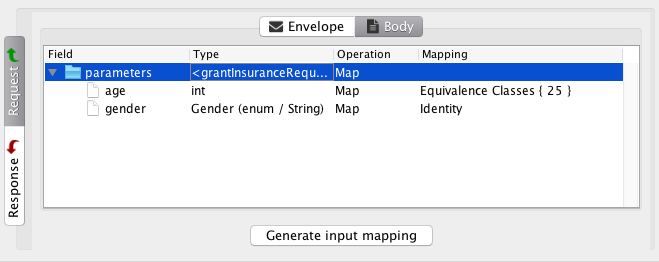
After clicking on the Generate button, we get an overview of the newly generated mapping:

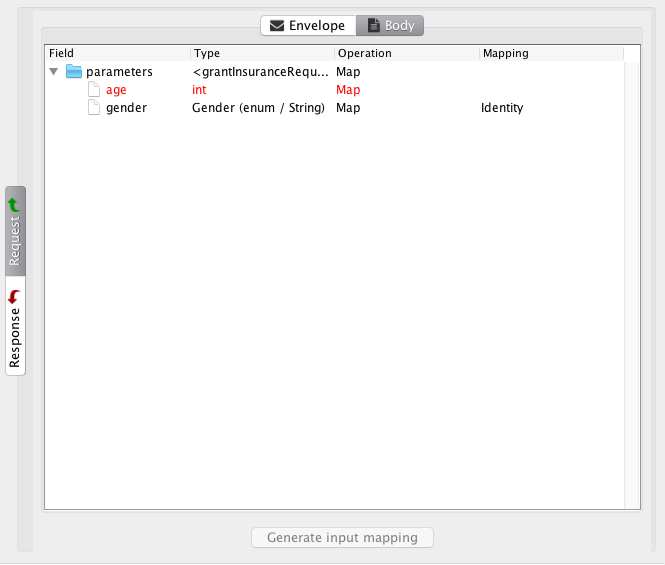
At the top, we see the definition of two input variables, age and gender. Both are defined as enumerations; age is derived from the equivalence classes we specified and gender is derived from the service definition.
The main area is dedicated to specifying the actual mappings. Each mapping is specified using an XPath expression into the request, and the value is specified using the Groovy scripting language. Since we didn’t specify a custom mapping, the tool has helpfully generated complete mappings for us in this case. We see the mapping for age returns 24, 25 or 26 depending on the enumeration it is given. We are free to alter the mapping function, or specify it from scratch. This also illustrates how we can define mappings from scratch: we just start out with an empty screen which allows us to add variables and mappings.
Due to the simplicity of the example, the generated mapping is actually done already (the tool-assisted part of the generation is expected to be just as powerful in most real cases), so we can switch back to the test outline:
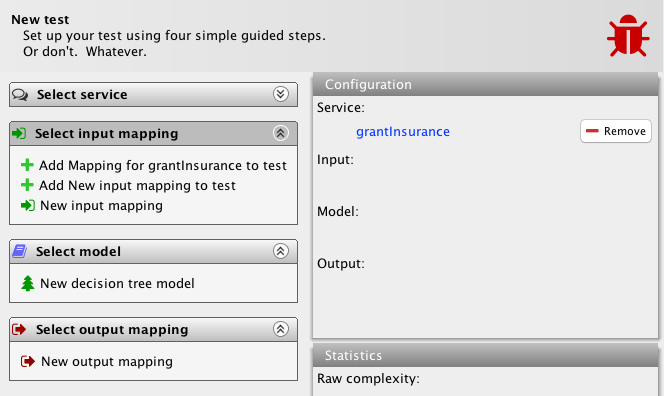
The imported service definition has been added to the test automatically as I imported it from there (as can be seen to the top-right), and the service task list has been collapsed (top-left). If I manually expand it, we see that it has been extended with a new task option to add the already imported service to the test. It will show a task for all available services whether I imported them from the test itself or otherwise.

The input mapping task list (left) has also grown with the two new mappings (the one derived from the model and the one created from scratch). If I click on the derived mapping, the view updates and shows these options:
We see the tool allows me to create a model from scratch, but it also adds a new action for the output mapping task list (bottom-left). This task is the teal transition from the meta-model, which allows me to procure an output mapping semi-automatically from a service definition and an input mapping. Let’s do that. Actually, this is just a placeholder action, so let’s just pretend we did that and see how the tool responds:

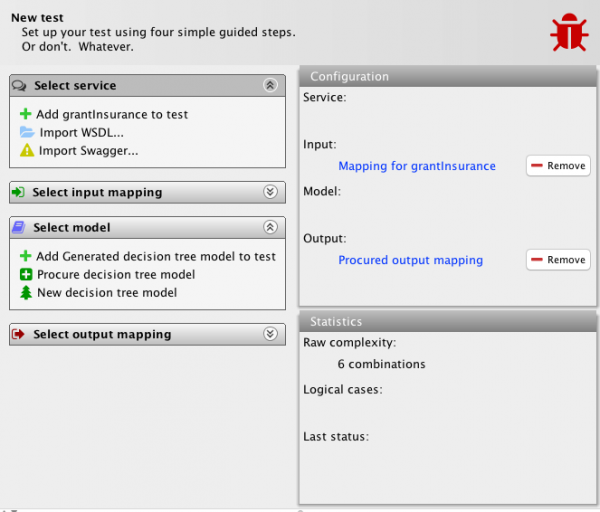
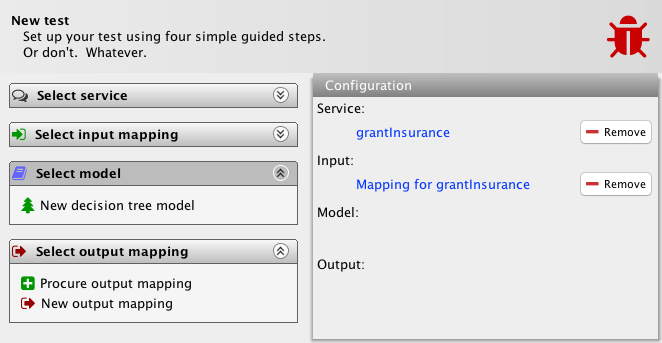
The procured mapping is added to the test and the task list collapsed. With the service definition, input and output mapping in hand, we can actually fully automatically generate a model by simply executing the service and making the model correspond to actually observed values. Let’s do that. With the same reservation that this is a placeholder action:
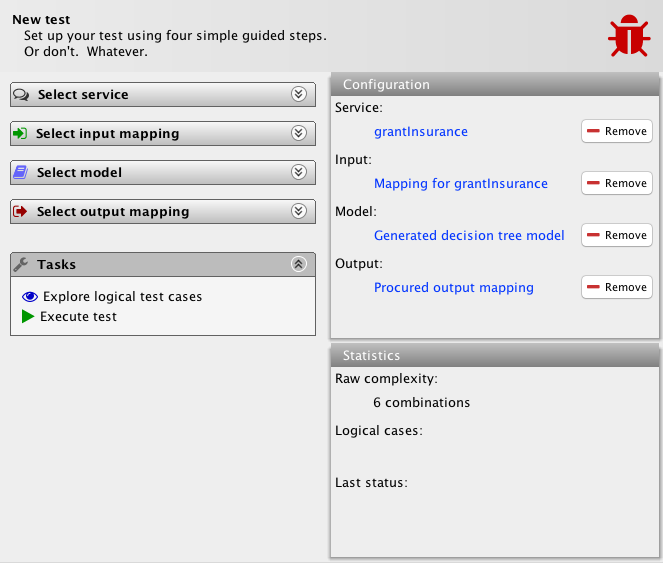
We have, guided and aided by the tool, defined the four artifacts, and we get a new task list allowing us to explore the logical test cases of the system, which have been computed automatically by the tool (except not in this version), and to execute the test, comparing the output of the service with the behavior defined by the model.
The system also provides a computation of the complexity of the test; it says it will execute 6 cases (there’s 3 equivalence classes for the age and 2 for the gender), and will in a later version also display information about logical test cases.
In the top-right window, I can click on each of the 4 artifacts to view and alter them directly, or I can remove them from the test. In effect, the test setup screen is ultra-simple and always provides all currently available and relevant options. It never forces you to take a specific route. In fact, let’s try out those remove buttons and go for another route. Here, we generated the model automatically from the 3 other artifacts. We can also procure it semi-automatically with just the two mappings available, so let’s get rid of the model and service definition:

We see that the system is already able to estimate the complexity of the test even without a service definition available. We also see that the hitherto unmentioned procure model is available. It was also available in the situation where we had all three artifacts except the model available, but now we no longer see the automatic generation task. We also get an option to add the already generated model. Instead, we will procure the model semi-automatically from the two mappings:
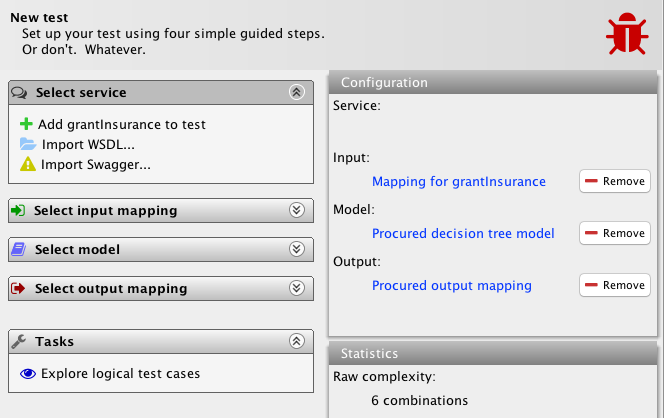
We get an updated list of options. Interestingly, we notice that the tool will allow us to explore logical test cases even though no service definition is available. This is useful for test-driven development and an also serve as a guide for implementation. In any case, it means we can set up the entire test even if we don’t have an implementation available. Of course, the execute action is not available, as it requires all artifacts be available.
Actually, the execute action depends on a bit more than just the availability of artifacts. If you recall, it is possible to set up partial input mappings. Those are mappings, where the domain of one or more of the input variables isn’t small. For example, suppose we set of an input mapping like this:
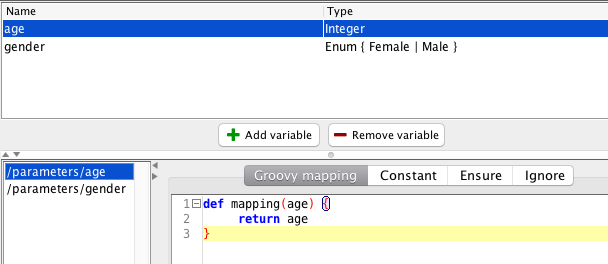
Now, the age is also mapped using an identity transformation, making its domain all integers. If we set up our test to use this altered mapping and also add in the service definition again, the tool responds:
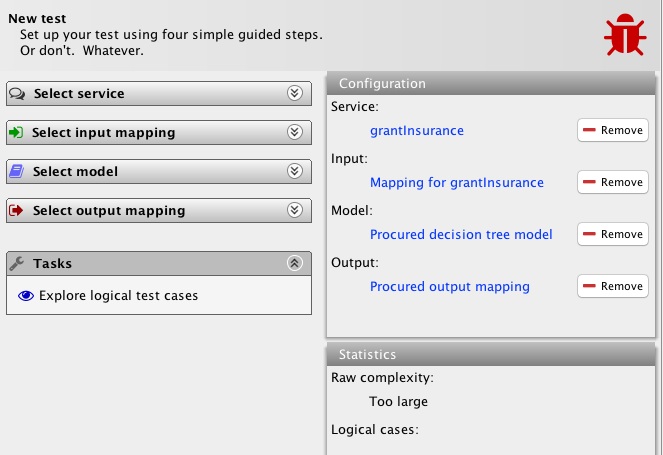
It says that the complexity of the system is too large (bottom-right) and does not allow us the execute action.
We see that the meta-model is implemented faithfully, even to the point of allowing concurrent actions to be executed in any order. Actions will show up as they become enabled. At any point, can the user go back and change their mind, either by manually removing an artifact from the test or just by selecting another one. The tool even illustrates a couple actions not part of the meta-model (which focuses on artifact generation at this time), namely computing the test complexity (depends on input mapping only) and exploring the logical test cases (depends on the input mapping and model).
Behind the scenes, I have significantly improved the WSDL parsing, so it can now handle much more complex examples. I have also added error highlights in multiple places; for example how about this error:

We are trying to map the enumeration type to an invalid constant value (Horse is not a gender, regardless of what Tumblr will try to make you believe).
I have also implemented my own observable collections library, which has replaced JavaFX internally. I am still working on making the collection views working properly, but the functionality is already much better than what I had.
I have integrated classical library SwingX, which used to be a great open source Swing extension library, which provides quite a few of the widgets I use (the tree table used for viewing service defnitions, task lists, the header on the test overview page, the outlines of the configuration and statistics boxes, and the error highlights in particular). I use the old open source version of JGoodies FormLayout for the contents of the configuration and statistics boxes. Finally, I am using the jIconFont Swing library to painlessly use FontAwesome icons (and in principle others) as standard application icons (hence the avalanche of more or less fitting icons).
I am currently working on getting the full pipeline going for the example, and will then start looking at the details. This means I am skipping some things (the schema validation is very lacking and there’s types I just outright don’t support yet, there is no support for deleting/renaming/saving/loading any artifacts, and the mapping editor is very limited).
The next step is to be able to set up output mappings (simple but boring) and generate input objects based on the mappings (daunting but should probably be interesting and easier than I fear once I get started). Once that’s in place, I should be able to actually call web-services, and implement the generation of models. That should round up all the artifacts, and I can focus on the more interesting things.
I am quite happy with the way the test overview has turned out. Let me know what you think in the comments! I would also like to have web-service examples for testing, even if I am not specifically bothering with making the WSDL editor robust right now.